Tuesday, 10 December 2019

Swedish House Crafts DT | Maja Design Holiday In The Alps Exploding Box


Hello, everyone!
I'm here with a festive exploding box that I have made using the newest Maja Design paper collection. This one is called 'Holiday in the Alps'.


Links to the products used can be found in text at the end of this post.


I made the base of the box with a sheet of snowflakes design paper, and matted the images that I cut from Winter night sentiment design paper onto arctic monograms paper.

I cut pieces from Laserowe Artic Sweeties pack to embellish each panel.


I used Laserowe 3D Christmas tree for the centre of my box. I painted it with white gesso, and once the gesso was dry I rubbed over the tree with dark gold wax. I adhered tiny gold jingle bells from my stash to each of the tree supports.

I made the tiny presents with some of the leftover Christmas in the Alps design papers.


I made the flowers with Lady E dies poinsettia, and flowers 004. The pinecones, and white berries are from my stash! 


Thank you for stopping by today!

Links to the products used;


Merry Christmas, and lots of festive hugs xx


Thursday, 21 November 2019

Free Hugs | Swedish House Crafts DT

Hello, everyone!
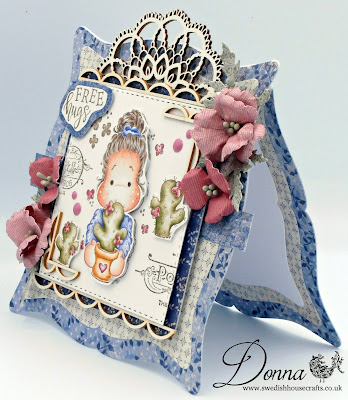
I'm here with a card that I have made featuring Free Hugs art stamp set from Magnolia Live Laugh Love collection 2019. 


I used all of the stamps from the set to complete my card.

Design papers are Maja Design - Denim & Friends - Blazer. I also used some lovely Laserowe Chipboard pieces, and made the tiny poppies using Lady E die.

Links to the products used can be found in text at the end of this post.


I coloured the images with my Polychromos pencils. I fussy cut Tilda, and the cactus. I adhered Tilda to the front of a square die cut with 2mm foam tape, and adhered the cactus with 1mm foam tape.
I used Laserowe round lace frame, and adhered it behind the die cut square
The borders top, and bottom of the square and the corners that I adhered to the square are taken from Laserowe chipboard rectangle scalloped frame, corners & borders.
I stamped, and cut around the free hugs sentiment and adhered it onto the corner wuth 1mm foam tape.


I made the poppies with design paper, and Lady E dies 006 poppy.


Inside the card is decorated to complement the front.

Thanks for stopping by!

Links to the products used;


Thursday, 24 October 2019

Bee You Tida | Swedish House Crafts DT


Hello, everyone!
I'm here with a card that I have created featuring adorable bee you Tilda from bee you art stamp kit. I also used Maja Design Celebration papers. As well as Tilda there are nine other designs on the single unmouted rubber sheet.

Links to the products can be found in text at the end of my post


I coloured bee you Tilda with my Polychromos pencils and fussy cut around her, I die cut a piece of white card, and stamped the corners with honeycomb image which is included on the rubber sheet.
I adhered bee Tilda to the front using 2mm foam tape.


I used a selection of flowers from my stash to coordinate with the papers and image.


I die cut the bumble bee using a die from my stash, and the Maja Celebration papers.


Inside the card is decorated with Maja Celebration papers to complement the front.

Thank you for stopping by today!


Below are links to the products used;


Thursday, 26 September 2019

Laserowe Winter Song Exploding Box | Swedish House Crafts DT


Hello, everyone!
I'm here with an exploding box that I have made for Swedish House Crafts DT using Laserowe Love Winter song papers, Laserowe 3D chipboard lantern. and new Lady E poinsettia dies.
To make the base, and box lid I used 300gsm white card from my stash!

Links to the products can be found in text at the end of my post.


I decorated each panel with the pretty Christmas papers, and embellished each one with images from the paper collection, chipboard pieces, and handmade paper poinsettias.


I decorated the centre square with Winter song papers. I assembled the 3D lantern, and painted it with white gesso. Once the gesso was dry I painted a coat of white crackle paste. Once the crackle paste was dry I rubbed over the entire lantern with wax to give a vintage look.

The tiny Christmas tree inside the lantern is from my stash! I coated the tree, and around the base of the tree with Snow-Tex. I hand tied gold jingle bells with twine and positioned them through a piece of shabby seam binding. The Snow-Tex, jingle bells, twine, and seam binding are from my stash!


I matted papers onto each of the panels. I used Roxstamps pierced circle die to cut out and mat papers on top of a scalloped edge die cut.
I cut around the bird from the paper collection, and used 2mm sticky pads to adhere it near the poinsettia. I made the poinsettia and holly leaves with paper and Lady E poinsettia die. The stamens in the centre of the poinsettia are from my stash!


I repeated the same on the above panel, but cut out a different bird from the paper collection.


I matted the papers, and used some chipboard pieces from my stash!

I repeated the same in the above picture.


I decorated the top of the box with pretty poinsettias that I made using the new Lady E poinsettia. and Winter leaves dies.


Thank you for stopping by today!

Below are links to the products used;


Saturday, 31 August 2019

Sea Themed Altered Light Bulb

Hello, everyone.
I'm stopping by to share another mixed media project with you!

This time I have altered a solar light bulb.
I chose a solar light bulb because it has a flat base which makes it easier to stand on a work surface whilst decorating 😊

I created a sea theme using lots of lovely sea shells, a resin seahorse, an ornate resin frame, reindeer moss, Prima art stones and glass melanges.


I gave the bulb a couple of coats of white gesso, and white crackle paste. Once decorated I painted it with teal, and precious stone bloom sprays.
When the colour was dry. I dry brushed over the embellishments with white gesso.

I am in the process of making a sea themed canvas which I will be sharing soon,

Thanks for stopping by.

Crafty hugs
Donna x

Friday, 30 August 2019

Altered Alarm Clock

Hello, lovely blogger friend's.
I hope you are well?

I've been dabbling in mixed media.
 I want to show you an alarm clock that I have altered. My inspiration came from Emilia. She is the foamiran flower queen! 
You can find her youtube tutorial HERE

Here is my take on the altered alarm clock.


I dismantled an old alarm clock that I picked up at my local charity shop, and painted it with white gesso. Once the paint had dried I used a sponge and a metallic gelato to add the colour.
I decorated the front of the clock with foamiran flowers that I made, artificial flowers, cheesecloth, stemmed pearls and cut out butterflies.

Below are a couple of angled pictures of my clock which sits pride of place in my craftroom.


Thanks for stopping by.

Crafty hugs
Donna xx


Wednesday, 7 August 2019

Hi Cookie - Nils Deer Jumper for Swedish House Crafts

Hello, everyone! Donna here with a Christmas card that I have made featuring one of the adorable new Hi Cookie digital stamps that Suha, Swedish House Crafts store owner has designed. There are five digital stamps to choose from. The complete downloadable collection can been purchased or there is the option to purchase, and download each of the images individually.

I chose Nils deer jumper to download, and colour, I used Maja Design Christmas Season papers to make, and decorate the card.

Links to the products used can be found in text at the end of my post.


I coloured Nils deer jumper image with Polychromos pencils, and cut around the image before adhering it to a die cut rectangle using 2mm foam tape.

To add some sparkle I used glamour dust on the hats pom pom, fur trim, and top of the slippers.

For the nose on the deer I used glossy accents. The glamour dust, and glossy accents are from my stash!

The small arrangement of flowers are from my stash!

I cut the post card, and greetings card  from a 12" x 12" sheet of Maja Design Christmas Season greeting cards. The sheet has a huge selection of post cards, and greeting cards to choose from.


Again, The flowers that I have used are from my stash! I used another greetings card from the 
12" x 12" sheet. The die cut tag, and shabby seam binding that I have positioned behind the flowers are from my stash!


Inside the card is decorated to complement the front.

Thank you for stopping by today!

Links to the products used;

Crafty Hugs


Thursday, 11 July 2019

Laserowe Love - Navy Romance Large Tags - Swedish House Crafts DT


Hello, everyone!
Donna here. This time with a couple of large tags that I have decorated with Laserowe Navy Romance papers.

There are 4 large chipboard tags on a sheet. Each one is a different design. Also in the collection of Navy Romance papers is a 12" x 12" sheet consisting of eight individual tags of which four are patterned, and the other four have flowers printed on them. Each of the paper tags are ready to cut out.

Links to the products used can be found in text at the end of my post.


I removed two of the chipboard tags with a craft knife, and cut out around two of the printed tags from the sheet of 12" x 12" Navy Romance papers. I adhered each of chipboard tags onto the printed paper tags.
I cut around the flowers from the floral printed tags, and adhered them to the chipboard tags with 1mm foam tape from my stash!
I cut around the pretty blue butterfly, and adhered it to the tag.
I used white foamiran, and Lady E die flowers 002 to make the small flower. The stamens are from my stash!


I repeated the same for the above tag using different designs.
I finished of by tying some shabby blue seam binding through each of the holes on the tags, and adhered tiny yellow flatback pearls. 
The binding, and pearls are from my stash!


Here you can see the back of the tags

Thank you for stopping by today!

Links to the products used;

Crafty Hugs


Friday, 5 July 2019

Laserowe Love - Navy Romance - Exploding Box | Swedish House Crafts DT


Hello, everyone! Donna here with an exploding box that I have made using new Laserowe Navy Romance papers. To make the base, and box lid I used 300gsm white card from my stash!
Links to the products used are in text, and can be found at the end of my post.


I decorated each panel with the pretty papers, and embellished each one with chipboard pieces, and handmade foamiran flowers.
Included in the paper stack are three 12" x 2/14" strips. They include butterflies, tags, and tiny flowers all ready to cut out.


I decorated the centre square with Navy Romance papers, and cut around the doily that is also included in the paper stack. There are several doilies to choose from on one design sheet. I assembled Laserowe rocking chair, and made the tiny pillow with a piece of blue fabric, and adhered a white pearl to the cenre. The book is made with design paper from Maja Design vintage romance.
I used white foamiran, and Lady E dies to make the flowers. The stamens are from my stash!

Below are more pictures of each of the decorated panels.


I matted papers onto each of the panels. I adhered chipboard peonies , and cut around the pink  peonies from one of the the design sheets, and adhered them on top.
The chipboard flower corners are included in the pack of peonies.
I cut around the blue butterfly, and added some sparkle to it.


I repeated the same on the above panel using different designs.


I used a metal die to cut one of the peony designs, and decorated it with white foamiran flowers placing Lady E dies tiny leaves between them.


I repeated the same on the above panel, but chose different flowers that again are made with white foamiran, and Lady E dies. I coloured the petals to match the papers prior to assembling them.


I used white foamiran and Lady E dies to make the flowers, and adhered them onto a Laserowe round ornamented frame placing tiny leaves between the flowers.


Thank you for stopping by today!

Links to the products used;
Laserowe Love - Navy Romance - Complete Collection
Laserowe Chipboard - Rocking Chair
Laserowe - Chipboard - Innocent and White - Round Ornamented Frame
Laserowe - Chipboard - Coral, Navy Romance - Peonies
Foamiran 0.6mm - 001 White, Aprox 30 cm x 35 cm
Lady E Dies - Tiny Leaves
Lady E Dies - Leaves 002
Lady E Dies - Flower 004
Lady E Dies - Flower 001