Tuesday 25 December 2012

Hubby's Christmas card.

Good afternoon and merry Christmas to you all.
This is my final Christmas card for this year. Boo!!! Making Christmas cards is my favourite theme as I love lots of glitter and sparkle. I'm like a big kid!  Lol.

I made this card for my wonderful husband who is mad about scooters and bikes.


I have used image TEDDYBO_212 "Scooter Bo"
Medium ~ Polychromos pencils
 Recycled & chocolate card ~ Woodware
Papers ~ "Krafty Christmas" LOTV
Snowflake 5 die ~ Cheery Lynn
White card candi & Alphabet letters ~ Craftworks cards
Sentiment ~ LOTV
5mm tan pearls ~ WOC
 
 
A sneak peek inside.
I have decorated the inside with papers, a heart die by Sizzix and a snowflake which I have adhered a 5mm pearl to the centre.
 
 
A close up of Bo on his scooter.
I sprayed the coloured image with Crafters Companion Spray & Sparkle.
He looks just like my husband lol and I love him.
 
 
Thanks for stopping by.
Big crafty hugs.
Donna xx


My mum's Christmas card.

Merry Christmas to all my lovely followers in blog land.
Today I want to show you a twisted easel card that I made for my beautiful mum.


I have used image FAIRYD_SNOWY6 from Teddybo.com
Medium ~ Polychromos pencils
Red & Green cardstock ~ WHS
Papers ~ Docrafts  Back To Basics "Vintage"
Doily edger punch ~ Martha Stewart
Lace ~ Creative Treasures
Lilies, Beaded Berries & pom-pom trim ~ The Ribbon Girl
25mm Rose, 10mm Roses, Gypsophilia & 5mm Pearls ~ WOC
Sentiment ~ computer generated
 
 
Once the image was coloured I sprayed it with Crafters Companion Spray & Sparkle.
When the image was dry I painted some Anita's PVA glue to the top of the post box, the ground and Snowy then sprinkled the glue with ArtDeco Glamour Dust which gives a gorgeous effect.


A closer look at the arrangement of flowers.
 
 
I am entering my card into the following super challenge:
 
Thanks for stopping by and for all your lovely comments.
Enjoy the festive holiday.
Lots of crafty hugs.
Donna xx


Sunday 16 December 2012

Tilda Christmas Star.

Good afternoon, crafty blogger friends.
My mum recently bought a wicker star from a craft market. She asked me if I could do something with it as she thought it was too plain so I dug it out today to have a play.
I have been itching to colour this Tilda image ever since one of my sweet blog land friends sent me her for my birthday this year.
I really enjoyed colouring her and if you are a follower of mine you will no doubt know that I don't very often colour images with skin and hair lol as it's mainly fur.

The stamp is from the Magnolia Sweet Christmas Collection 2011.
She is called "Midwinter Tilda with lantern."


Stamp the image onto smooth white cardstock.
I have die cut the image using Spellbinders Nestabilities Beaded Oval and coloured Tilda with polychromos pencils.
Once coloured I lightly sprayed it with Spray & Sparkle from Crafters Companion and left it to dry.
 
 I added some Anita's PVA glue to the top of Tilda's lantern, along the lace on her skirt and to the pom-pom on her hat then sprinkled the areas with ArtDeco Glamour Dust.
This gives a gorgeous effect.
 
The gingham bow was already attached to the star I just added a rose, leaves and two gold jingle bells to the centre.
 
 
The 5mm pearls and arrangement of roses are from Wild Orchid Crafts.
The leaves are Martha Stewart's Woodland branch punch.
 
 
A close up of sweet adorable Tilda.
 
My mum loved it.
 
Thanks for stopping by and for all the lovely comments.
 
Big crafty hugs.
Donna x


Saturday 15 December 2012

"Oh Christmas Tree"

Good afternoon, crafty blogger friends.
Today I have made another card featuring a Christmas tree which is being decorated by the gorgeous bears from Teddybo.com.


I have coloured image TEDDYBOBEA_063 "Christmas Elves!"
Medium ~ Polychromos pencils
Green card ~ WHSmith
Papers ~ Docrafts back to basics "Vintage"
Glamour Dust ~ ArtDeco
Berisfords 15mm Teal satin ribbon ~ local wool shop
Snowflakes embossing folder ~ Crafts Too
Woodland branch punch ~ Martha Stewart
Rose ~ WOC
Jingle bells ~ Cuddly Buddly
Sentiment ~ LOTV
 
I have added tiny green rhinestones to the sentiment and added frosted ice Stickles along the edges of the ribbon. I have used the Stickles on the branches too.
 
 
 The image has been cut around and adhered with sticky pads.
 
I have added glue to the tinsel, stars, hats and pom-poms then sprinkled with glamour dust to give a gorgeous sparkly effect.
 
 
A close up of the "Christmas Elves!"
 
I am entering my card into the following super challenges:


Thanks for stopping by and I appreciate all your lovely comments.
Big crafty hugs.
Donna x


Friday 14 December 2012

Fairytale Friday showcase


Good morning, crafty bloggers.
It is Fairytale Friday once again at Teddy Bo towers. Today Team B are showcasing some of their past creations so why not pop over and have a look! While you are there you could catch up with all the going on's in the towers.

Kirsty-Anne who is one of my beautiful blogland friends got hitched this week and so I made the happy couple a card which I am showcasing today.
 
 
Here is their card.
 

I have used image TEDDYBOBEA_006
Medium ~ Polychromos pencils
White doily ~ Ebay
Scalloped circle die ~ Sizzix
Glamour Dust ~ ArtDeco
Flowers & 5mm pearls ~ WOC
Heart charm ~ The Ribbon Girl
Sentiment ~ LOTV

Sorry but, I can't remember where I got the pretty papers from.
 
 
I have added glue and a sprinkle of Glamour Dust to the car hood and Bea's veil.
 
 
A peek inside.
The inside of the card is also decorated with the pretty papers.
 
Congratulations
Mr & Mrs Duckworth!


Thanks for stopping by, for all the lovely comments and have a lovely weekend.
Big crafty hugs.
 
Donna x


Tuesday 11 December 2012

A mailbox tutorial

Good afternoon crafty bloggers.
A few weeks ago I made a mailbox to store some 6"x6" cards into and I thought it would be nice to make a tutorial on how I made it.
Please let me know what you think as this is my first attempt at making a tutorial.
I hope you like it and will give it a go!?!?!


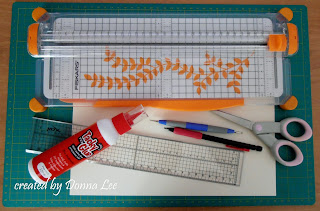
You will need card, glue, a pencil, a ruler, a scoring stylus, scissors and a paper trimmer.


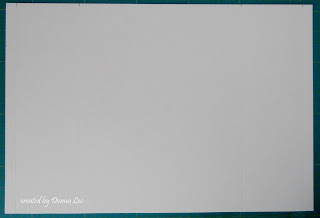
Cut the card to measure 30cm x 20cm.
Position the card landscape and score diagonally at 1, 7, 23 and 29cm.


With a pencil, mark up16cm on each side and cut each corner to the centre score line.
Fold in the score lines.


The first part of the mailbox should look like this.


Cut another piece of card to measure 24cm x 20cm.
Score the card 2cm on each side.


Position the card landscape and score at 2cm and 8cm from the right hand side of the card.


With the card portrait cut 16cm up along either side of the 2cm score lines.


With a pair of scissors cut the card at an angle either side of the score lines at the top and below where the score lines meet.


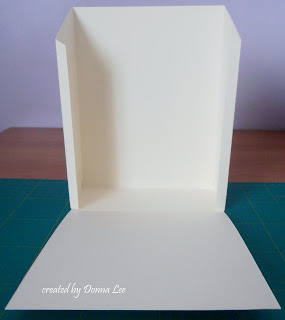
Fold the score lines inwards to look like this.
That completes the second part of the mailbox.


Glue the bottom flap to the inside of the box making sure the angled corners are at the top.


Glue the flaps inside the box.


Position and glue the front panel on each side.


Cut a piece of card to measure 19cm x 11cm and score a 2cm line at the top.


Punch the opposite end with the doily edger punch.


position the lid of the box so there is an equal overlap at each end and mark with a pencil.


Cut up to the score line and across at both ends.
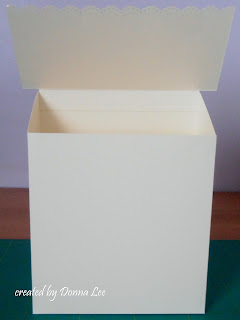
Glue the flap to the inside top of the box.


This is how it should look.

Ta dah!
One cute little mailbox to store your 6"x6" cards in


This is how the mailbox looked after I had decorated it.
 
Big crafty hugs.
Donna xx


Tuesday 4 December 2012

Teddy Bo Tuesday "Candy king"

Good morning, crafty bloggers.

Welcome to another Teddy Bo Tuesday. There is a fabulous sale in store now until Christmas eve with an amazing 35% off all the graphics including D'arcy's Diaries and Wonderland Stamps. There are no more new graphics now until the new year. Most of the girls will be showcasing their past creations and as this is my first Christmas at the towers I will be making cards with images that I have previously purchased or with the more recent ones that my boss lady Gayle has drawn. so for my card this week I have chosen an older image called "Candy king".
 
I hope you likey?


I have used image TEDDYBO_153 "Candy king" found here
Medium ~ Polychromos pencils
Red & Green cardstock
Papers ~ Docrafts Back To Basics "Vintage"
Holly flourish ~ Cheery Lynn
Woodland branch punch ~ Martha Stewart
Flower & 5mm pearls ~ WOC
Sentiment ~ LOTV
 
I have added tiny red rhinestones to the holly flourish and sentiment.


A sneak peek inside the card.


A close up of Bo.
 
Our current and last challenge for this year is "Anything Goes". You can make anything you like as long as it features a Teddy Bo & Co image. To be in with a chance of winning 5 fabulous images just submit your entry before midnight Sunday 9th December uk time.
 
I would like to enter my card into the following super challenges
 
Well that's it from me for today as i'm off to my craft room to make some more Christmas cards.
Thank you for all your lovely comments and have a good day!
Crafty hugs.
 
Donna xx


Tuesday 27 November 2012

Teddy Bo Tuesday and new releases.

Good morning, crafty bloggers.
It's Teddy Bo Tuesday once again! Where has this year gone? We have some fabulous new releases in store today.
 
 
And here is my creation with one of the new images this week.
 
A gate fold card
 
 
I have used image TEDDYBOBEA_147 (found here)
Medium ~ Polychromos pencils
Recycled kraft card
Papers ~ "Krafty Christmas" LOTV
Holly Flourish ~ Cheery Lynn
Doily edger punch & Woodland branch punch ~ Martha Stewart
Flower & Lace ~ The Ribbon Girl
Pearls ~ WOC
Sentiment ~ Freebie from C&P


The card free standing.
 
 
 Adorable Bea and charming Bo.
 
 
I enhanced this picture using PhotoScape.
I love it.
 
As well as the new releases today, we are also starting a new challenge which is "Anything Goes." To be in with a chance to win 5 fabulous digital images all you need to do is make anything crafty as long as it features a Teddy Bo & Co image. The challenge runs for two weeks closing midnight GMT December 9th so there is plenty of time to enter.
 
I would just like to say a big thank you to Jill and Kirsty-Anne my beautiful blogland friends for my gorgeous birthday cards and gifts which I will treasure forever.
 
I am entering my card into the following challenge:
 
Thank you for stopping by and thanks for all the lovely comments.
Until next time.
Crafty hugs.
Donna xx


Friday 23 November 2012

Fairytale Friday


Good morning, crafty bloggers.
It's Fairytale Friday over at the Teddy Bo challenge blog  Woo Hoo!!!  Here is what I have made this week.
I finally got around to making a mailbox and I have to admit I was quite pleased with the completion as I do not possess a scoring board so it was just a ruler, pencil and scoring stylus. It just goes to show that I can score without a board which takes longer I know but, it can be done.

A cute little Mailbox to store my 6"x6" cards in to.


I have used image TEDDYBO_233
Medium ~ Polychromos pencils
The mailbox is made with 300gsm Cream Conqueror card
Tutorial found HERE
Papers ~ "Krafty Christmas" ~ LOTV
Snowflake 5 ~ Cheery Lynn
Beaded oval ~ Spellbinders Nestabilities
Doily edger punch & Woodland branch punch ~ Martha Stewart
Snowflake charm ~ The Ribbon Girl
Roses & 5mm White pearls ~ WOC
Sentiment ~ Birdscards.com

I have sprayed the coloured image with Crafters Companion Spray & Sparkle and added glue sprinkled with Glamour Dust to the snowman and snow.
 
Lots of pics to show you.
 

and.......

 
And finally.......
 
I hope you likey?
 
 
Our current challenge which is "Anything Goes" ends this Sunday 25th November at midnight so there is still time to get those creative juices flowing.
If you are looking for some inspiration then why not pop over to the Teddy Bo & Co challenge blog to see what the rest of Team B have created this week? While you are there you could catch up on all the going on's in the towers. "Oh we do have fun" lol.
 
I am entering my mailbox into the following challenges;
 
Thats it from me for now as I am off to enjoy my birthday.
 
Thanks for stopping by and I really do appreciate all the lovely comments.
Big furry crafty hugs.
Donna xx


Tuesday 20 November 2012

Teddy Bo Tuesday

Good evening, crafty bloggers.
Today at Teddy Bo & Co there are some fab new releases.
 
 
And...........
 
They are swell!
 
We are mid way through our current challenge which is "Anything Goes" on the Teddy Bo challenge blog. One lucky crafter gets the chance to win five digital images of their choice with two runners up getting one digital image each. You can make anything you like as long as it features a Teddy Bo & Co digital image.
What are you waiting for?
The challenge ends GMT midnight Sunday 25th November and I'll be back on Friday with my latest Teddy Bo project.
 
Thanks for visiting.
Crafty hugs.
Donna xx