Thursday 13 December 2018

Swedish House Crafts - Maja Design Christmas Season 3D Box

Hello, lovely blogger friend's

I'm here with my latest project for Swedish House Crafts.

I have decorated one of the Laserowe chipboard 3D boxes.
I covered the box with the new collection of papers from Maja Design called 
"Christmas Season"

Links to the products can be found in text at the end of my post.


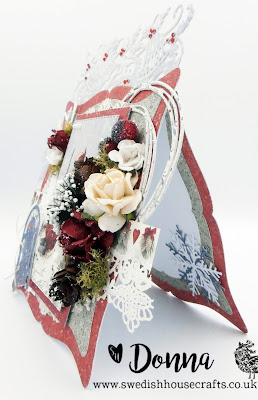
A side view of the box


I decorated the inside panel with hang the mistletoe paper. 

The pom pom trim that I have adhered around the opening is from my stash!

I adhered, and layered Gummiapan fluffy trees with 3D foam tape to the front. Once the fluffy trees are sold out, they won't be back in stock.

The chipboard snowflakes, and let it snow sentiment are Laserowe Arctic Sweeties.

The die cut deer, is from my stash!

Thanks for stopping by today!

Links to the products used;


Friday 7 December 2018

Swedish House Crafts - Maja Design Christmas season Exploding Box

Hello, lovely blogger friend's.


I'm here as well as on Swedish House Crafts blog with an exploding box that I have made using the new collection of Maja Design papers called Christmas Season. 

Links to the products can be found in text at the end of my post.


To make the base of the box I used a 12" x 12" sheet of Christmas Season Deck the Halls paper, and decorated each panel with papers from Christmas Season 6" x 6" Paper pad.


To decorate the centre of the box I used Laserowe chipboard 3D Christmas tree. I assembled the tree. and painted it with white gesso. Once dry I adhered a length of tinsel trim around the tree. I painted the star on the top of the tree with gold paint, and made each of the tiny presents.

Below are some close ups of each of the decorated panels.


The banner is from my stash! 

I love the images that are included in the 6" x 6"paper pad. The images on the 12" x 12" sheets are a lot bigger.

I have handmade the flowers using the papers and a poinsettia die from my stash!


I especially love this image. The chipboard snowflake that I've sprinkled with glitter is Laserowe. I adhered a pearl to the centre.


The trees are Gummiapan fluffy trees, and the snowflake is Laserowe.


To make the lid I used white card, and decorated it with papers from the 6" x 6" pad.

The resin cherub is from my stash!

I made the tag using the papers, and attached it to the top of the lid with a length of white string.

The wooden joy sentiment is from my stash!

Thanks for stopping by today!


Links to the products are listed below;

Thursday 29 November 2018

Swedish House Crafts DT Laserowe Love Arctic Sweeties Pop Up Box Card


Hello, lovely blogger friend's!
I'm here with a project that I have made using the new Laserowe Love Arctic Sweeties complete collection.
This time I have made a pop up card box. I've never made one before. It was so easy to make. and I thoroughly enjoyed it 😊


I used white card to make the card base and covered it with Arctic Sweeties paper.

Links to the products used can be found at the end of this post.


I cut around each of the characters. Some of the characters that I used are on a 12" x 12" sheet, and others are on strips of motifs. I adhered the cut outs onto strips of clear acetate.

The snowy branches are taken from a die that came with last years Magnolia vintage box.


I just adore these little arctic characters. I added some glamour dust from my stash to the balloons, and presents.


 I used Roxstamps pierced circle die on the three flaps of the box, and on two of them adhered a Gummiapan snowflake die cut. The purple 3mm pearl flatback in the centre of the snowflake is from my stash!


I cut out, and added a tag to the back of the box. That way you can write your own personal festive message. I hung the tag with a length of white string and secured to the back of the box with a tiny silver brad.

That's all from me today! Thanks for stopping by! 

Links to the products I used;


Thursday 15 November 2018

Swedish House Crafts DT | Laserowe Arctic Sweeties Christmas card

Hello, everyone!


I'm sharing a Christmas card here as well as on the Swedish House Crafts blog that I have made using the new Laserowe Love Arctic Sweeties complete collection. There are 6 12"x 12" double sided sheets as well as 3 strips of 12" x 2" double sided cut out motifs. 

I used Gummiapan old paper die to cut and layer the papers to the card front.

Links to the products used can be found at the end of this post.


I took one of the strips, and cut around the penguin, and the polar bear.
I added glamour dust to the purple heart, and the polar bears scarf. 


I used Arctic Sweeties paper to die cut a Gummiapan stitched scalloped circle, and put it to one side.
One one of the 12" x 12" design sheets has 12 gorgeous images. I chose the polar bear image.
I cut the image using Roxstamps stitched circle, and matted it onto a larger stitched circle using "Arctic Sweeties" papers, and adhered that onto the scalloped circle.

I used glamour dust on the pom pom of the bears hat.


I cut around the banner from one of the sheets, and cut out some paper letters from my stash to spell the word Noel.


The Laserowe chipboard snowflake garland that I used is one of three sizes included in the pack. I chose the larger garland, and decorated it with pearl flatbacks from my stash!


The flowers are from my stash! 


Inside the card is decorated to complement the front.

Thanks for stopping by today! 

Links to the products I used;


Tuesday 30 October 2018

Swedish House Crafts Laserowe Love baby Boy Exploding Box And Giveaway

Hello, lovely blogger friend's.

I'm showcasing my project for Swedish House Crafts here as well as on Swedish House Crafts blog.
😊😊😊😊😊


I have made an exploding box using some of the new gorgeous Laserowe Love papers, and chipboards that are now available to buy in store. There is so much to choose from at really great prices. If you've never heard of Laserowe before then I highly recommend that you take a look in store.

I used Neenah desert storm cardstock to make the base, and lid of the box,

Links to the products that I have used on my exploding box can be found at the end of my post.


 I decorated each of the panels with Laserowe Love Vintage baby boy complete collection papers.


I die cut five Gummiapan pierced scalloped circles using Neenah desert storm cardstock, and I die cut five Roxstamps pierced round dies using white card. I matted one onto the other, and adhered each one onto the centre of each of the panels with 1mm foam tape.

There is a sheet of nine gorgeous images included inside the paper stack. I cut around four of them, and adhered each one to the centre of each of the circles using 2mm foam tape.


I assembled Laserowe chipboard 3D elephant with pva glue, and painted it completely with black gesso. Once the gesso was dry, I brushed blue wax over the elephant leaving the wheels black. I adhered a large white pearl flatback to the centre of each of the wheels. I attached a length of twine through the elephants trunk, and adhered the elephant to the centre of the box.


To decorate the lid I adhered a Gummiapan stitched square die cut on top of the design paper.
I used Laserowe chipboard elephant toy for the top. I painted the base of elephant in the same way as I did for the 3D elephant. Once dry, I adhered the detailed chipboard elephant onto the base.

The flowers, seam binding that I used to make a bow, and the silver bear charm are from my stash!


There is a gorgeous set of tags included in the paper stack.
I cut around one of the tags, and threaded a length of twine through the eyelet. I adhered the twine underneath the bow, and adhered the bear charm to the centre.


On to the exciting part. I am giving away my exploding box to one lucky person in our Facebook group Swedish House Crafters lounge. Everyone has a chance to win, but first you will need to join our facebook group, and leave a comment mentioning to whom you would like to give the exploding box to or maybe you would like it for yourself? 
The giveaway is open for 7 days. After that time we will draw a winner in the Swedish House Crafters lounge group. I will also announce the winner in a short blog post on here. You can find the link to join Swedish House Crafters lounge group below.


Thanks for stopping by today! You can find my own personal blog HERE

Links to the products I used;
Sunday 14 October 2018

Our Last LHOSM Challenge - Anything Goes - Flower Shop Tilda

Hello, lovely blogger friend's.
I hope you are well.
Sadly this is our last challenge on the Lovely Haenglar or Sweet Magnolia blog.

Our final challenge theme is nice and easy.....................It's
ANYTHING GOES!
Our wonderful sponsor is NOOR UK

For this challenge I have coloured up Flower Shop Tilda from the Upgrade Le Fleur collection 2018.
I have coloured her with Prismacolor & Polychromos pencils.

To create the card, I used GoKreate large frame frilly # 9.

I used Maja Design Enjoying Outdoors papers.

Other dies used are; Cheery Lynn English tea party doily, Sue Wilson lattice arched adornment, magnolia Doohickey sprawling ferns, and dies taken from Magnolia Doohickey Club vol's 16 & 17.


A close look at adorable Flower Shop Tilda.
After I'd coloured Tilda I used a Gummiapan nesting stitched squares to cut around her. I cut a second larger square using Maja Design papers, and matted the image on it.
I dotted Tilda's cheeks with a white gelly roll pen.


I die cut the bird house's using dies from Magnolia Doohickey Club vol 17.
The flowers are from my stash!
I used Magnolia Doohickey sprawling ferns between the arrangement.


The tree, leaves, and basket are cut using dies from Magnolia Doohickey vol 16.


Inside the card is decorated to complement the front.

Our challenge will run for one whole month, and will close on Friday 9th November at 5pm UK time.

My teaamies have designed some gorgeous creations.
Why not pop over HERE for a peek?


Thank you for stopping by today!

Crafty hugs


Thursday 4 October 2018

Swedish House Crafts DT - Joyous Winterday's - Snowman

Hello. lovely blogger friend's.

I hope you are well.

I'm here as well as on Swedish House Crafts blog with another Christmas card that I have made using Maja Design Joyous Winterdays papers. I so love this festive collection of papers from Maja Design.


For the shape of my card I used GoKrate large frame frilly # 9
Other dies used from my stash are; Marianne Design Anja's Vintage decoration, Ivy circle, Joy Crafts Ice crystal, and Spirit of Christmas snowflake border.

The pretty lace, and pearl trim along the bottom of my card are from my stash!

Links to the products are in text, and can be found at the end of my post.


I cut the image using Gummiapan stitched rectangles, and matted it onto a larger rectangle using "joyous Winterday's" papers.

I highlighted the shaded areas on the snowman by using glamour dust to give a lovely sparkle.


I used a selection of flowers from my stash! The pine cone is coated with Snow - Tex.


The birdhouse is cut from Magnolia Doohickey Club vol 17, and the snowy branches at the bottom of the birdhouse are cut from Magnolia Vintage Box 6th Edition.

Thanks for stopping by today! You can find my own personal blog HERE

Links to the products I used;


Thursday 20 September 2018

Swedish House Crafts DT - Joyous Winterdays Santa Claus

Hello, lovely blogger friend's.
I'm here as well as on Swedish House Crafts blog today with a Christmas card that I have made using Maja Design "Joyous Winterdays" papers.

Links to the products are in text, and can be found at the end of my post.


For the shape of my card I used GoKreate large frame frilly #9.

I used crafter's Companion Edge'ables jingle bells, for the top of the card, and Sizzix On the edge snowflurries at the side.


I cut the image using Gummiapan stitched rectangles, and matted it onto a larger rectangle using ""Joyous Winterdays" papers. The 3mm white pearl flatbacks are from my stash!


The die cut tree is from Magnolia Doohickey club vol 16, and the die cut sled is cut from Magnolia Doohickey club vol 17. I attached a length of natural twine to the sled.


Behind the the image, I placed a couple of Gummiapan doodle circle die cuts.

The flowers are from my stash!


Inside the card is decorated to complement the front. The snowflakes inside the card have been cut using Gummiapan snowflake die.

Thanks for stopping by today! 

Links to the products used;