Tuesday 23 December 2014

Cosy Tilda

Good evening, crafty blogger's.
I hope you are well?
The big day is nearly here! Yippee!!! Lol!
Today I  have made another Christmas card. This one is for my husband's work colleague Aana..
Aana is the lady who asked me to make lots of Christmas cards for her friends and family this year.I am very grateful to her because for at least two years I have struggled to sell my handmade cards. I tried Etsy, Ebay and Facebook but, I never had any real success. Now Aana's friends and workcolleagues are wanting one of my hand made cards which is great as my passion is making cards.
So this Christmas card is a little thank you too.

I couldn't resist colouring this little beauty so I have used Cosy Christmas Tilda from the Waiting For Christmas 2014 Collection.
The image is stamped with Memento rich cocoa ink onto Neenah cardstock and cut out using a CartUs oval and matted onto a Joy Crafts Noor Design oval.
I have coloured the image with Prismacolor and Polychromos pencils.


For my shaped card I used GoKreate large frame frilly #2 and Maja Design A Gift For You papers.
Other dies used are La - La - Land heart doily border, Sizzix on the edge snow flurries, Marianne Design Ivy circle, Christmas tree 1 and lamp. Joy Crafts Billes flourishes, Cheery Lynn pine branches and Doohickey bloomy tag. I put the bloomy tag into a canvas corp mini bag and tied a couple of bells to it with a piece of hemp twine from The Ribbon Girl. The bag and bells are from Live & Love Crafts.
I lightly sanded the papers and inked all the die cuts with Tim Holtz tea dye distress ink.
The lace across the bottom of the card is from Live & Love Crafts.


I finally got around to using the beautiful ivory & gold lush poinsettia from The Ribbon Girl I coated the poinsettia with a little Snow - Tex.
The Marianne Design Christmas tree is also coated with Snow - Tex and I decorated it with a string of 2mm white pearls. The lamp has been coated with Twinklets Diamond Dust and a little Snow - Tex.
The sentiment is computer generated in MS Word using a vintage digi stamp from Pink Gem Designs


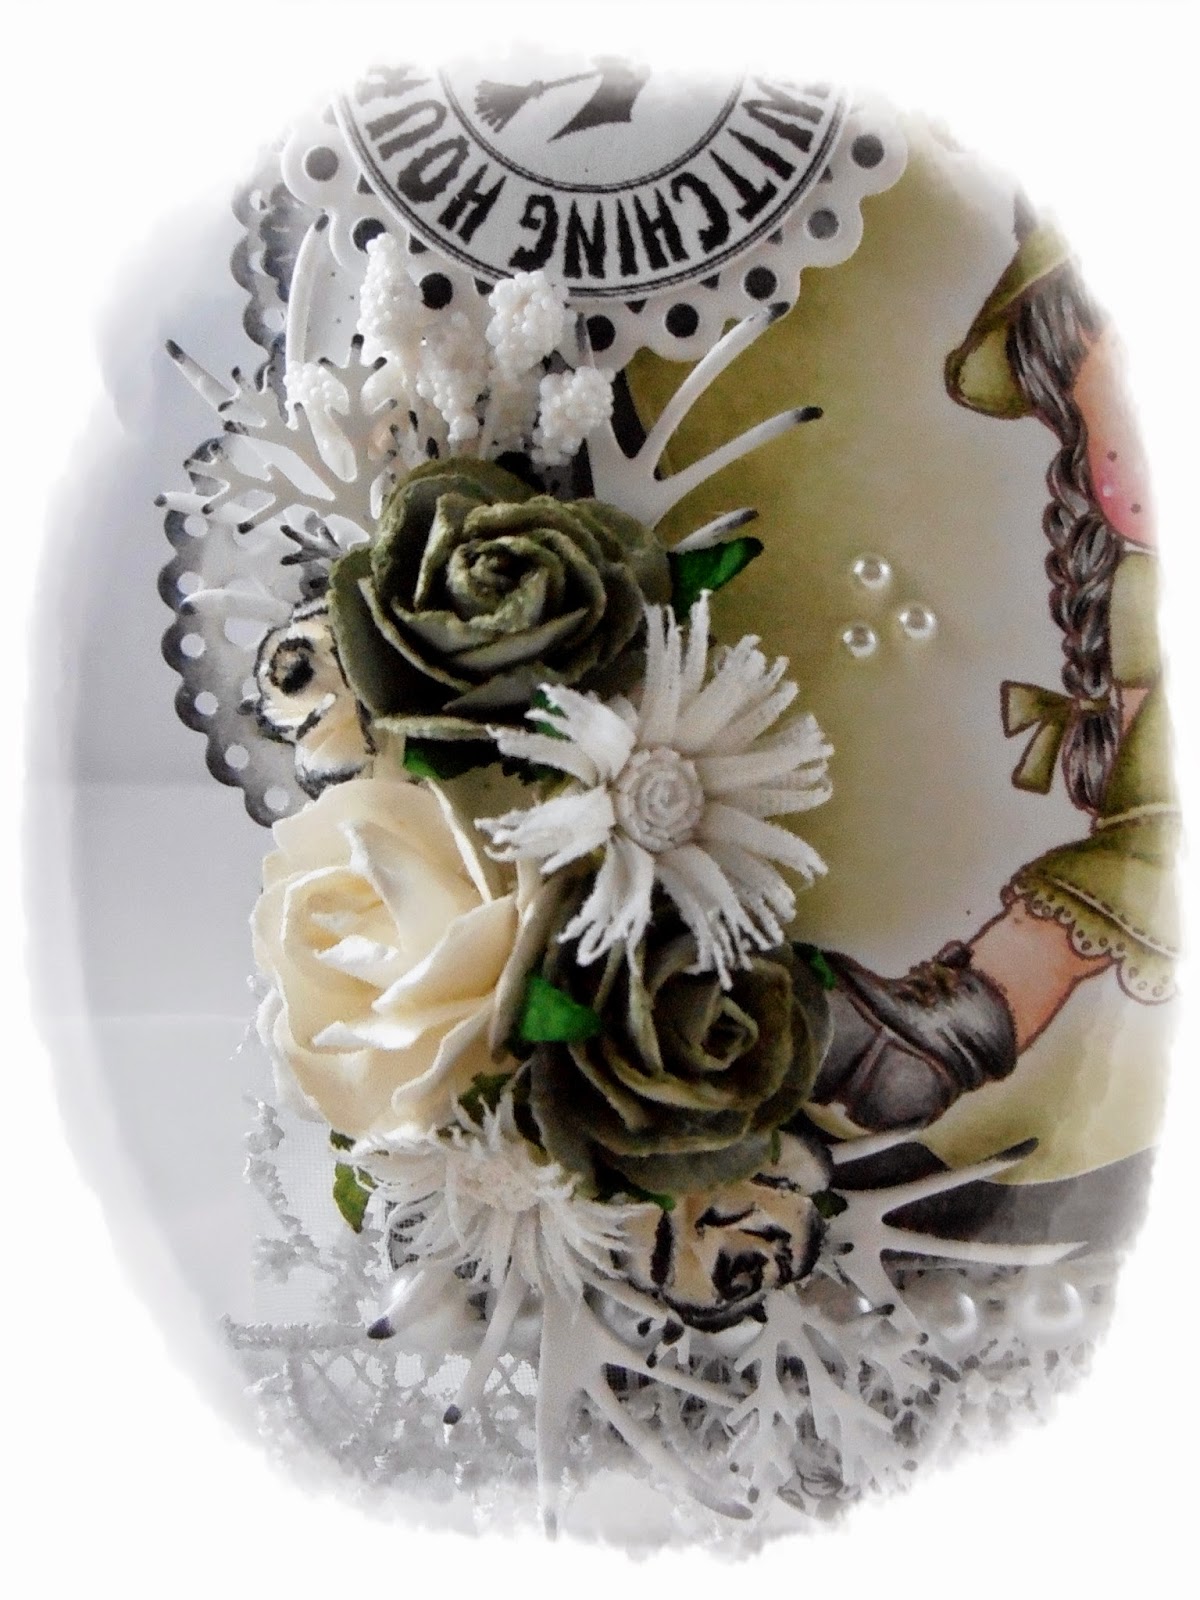
Here is a close up of Cosy Tilda.
I added glamour dust to her collar, cuffs and pom pom and used white liquid pearls to dot around the image.
I have dotted Tilda's cheeks with a Inkssentials opaque white pen.


Inside the card is decorated with design paper and a Joy Crafts Noor Design oval.

I hope you like it?

I am entering the design team call at The Ribbon Girl and entering my card into the following super challenges;


Thanks for stopping by to visit today and big thanks for all the lovely comments.
Festive crafty hugs.
Donna xx


Saturday 20 December 2014

Tilda In Evening Dress And Our Final Challenge Of 2014 At Simply Magnolia.

Good evening, crafty blogger's.
Sorry! I'm very late with my DT post for Simply Magnolia I have been busy making commissioned Christmas cards for hubby's work colleagues. I finally finished the last one today. 
 Our new challenge is Anything Goes and runs for a whole month through until the new year.
We have three wonderful sponsors for this challenge;
Stamp & Create
The ribbon Girl
The Rubber Buggy

I have another commissioned card to share!
I used Tilda In Evening Dress from the Little Circus Moscow Collection 2013.
The image is stamped with Memento rich cocoa ink onto Neenah cardstock and cut out and matted using a Joy Crafts Noor Design oval.
I have coloured the image with Prismacolor and Polychromos pencils.


For my shaped card I used GoKreate large frame frilly #2 and Maja Design Vintage Spring Basics papers.
Other dies used are La - La - land heart doily border and filigree corner. Doohickey bloomy tag, Marianne Designs medium bow stars, Joy Crafts Billes flourishes and Cheery Lynn pine branches.
I lightly sanded the papers and inked the die cuts with Tim Holtz tea dye distress ink.
I used shabby white ruffle trim from Live & Love Crafts across the bottom of the card and adhered 6mm white flat backed pearl string along the centre.


I used a selection of flowers from Wild Orchid crafts, The Ribbon Girl and Live & Love Crafts for the arrangement.
I placed a blue brad through the centre of the bow and painted a small amount of modelling paste around the edges.


I used a bronze vintage frame from The Ribbon Girl. Painted it with white Gesso and adhered 3mm and 5mm pearls onto it.
I used Pion studio of memories letters for the name


Here is a close up of Tilda.
I added glamour dust to the stars and used white liquid pearls for the bubbles and around the image.
I dotted Tilda's cheeks with a Inkssentials opaque white pen.


Inside the card is decorated with design paper and a Joy Crafts Noor Design oval.

We would love you to come and join in with our challenge.
My teamies have designed some gorgeous creations. Why not pop over for a peek?

Thank you for stopping by to visit and big thanks for all the lovely comments.
Crafty hugs
Donna xx


Friday 12 December 2014

Little Santa And Christmas Tree

Hello, crafty blogger's.
I hope you are well? Not long before the festive season is upon us and still so much to do. I have been busy making Christmas card orders and I still haven't got around to putting up the tree.
Anyway. I am here to share a card that I have made for a special friend.

I used Waiting For Christmas Tree and Little Santa from the new Waiting For Christmas 2014 Collection.
I stamped and masked the images with Memento rich cocoa ink onto Neenah cardstock and cut out using  CartUs oval and matted it onto a Joy Crafts Noor Design oval.
I have coloured the images with Prismacolor and Polychromos pencils.


For my shaped card I used GoKreate large frame frilly #2 and Maja Design A Gift For You papers.
Other dies used are La - La - Land heart doily border Sizzix on the edge snow flurries, Marianne Design ivy circle  Christmas tree 1. Joy Crafts Billes flourishes and Cheery Lynn pine branches.I inked the edges of all the die cuts with Tim Holtz frayed burlock distress ink and painted lots of Snow - Tex onto the snow flurries.
The pretty lace, bark heart and jingle bells that I tied together with a piece of hemp twine are from Live & Love Crafts.


I have coated the tree with Twinklets diamond dust and used a string of white pearls to decorate it.
The Vintage digi Christmas sentiment is from Pink Gems Designs
For the arrangement I used a selection of roses, frosted berries, flower spray, lilac roses, an apple and decorative pins all from Live & Love Crafts.
 I coated the arrangement with Snow - Tex.


Here is a close up of Little Santa and Christmas tree.
I have added glamour dust to Santa's cuffs, hat trim, he star and bells on the tree. I  adhered a gold jingle bell to the end of Santa's hat.
I dotted Santa;s cheeks with a Inksentials opaque white pen and used white liquid pearls around the image.


Inside the card is decorated with design paper and a Spellbinders stately circle.
I am still struggling to get the lamps angled correctly when taking a photo of my cards inside my soft photo cube.
It's driving me mad! Lol!!! Any tips?

I hope you like my card?

I am entering my card into the following super challenges;


Thank you for stopping by to visit my blog today and big thanks for all the lovely comments.
I'll be back on Sunday with my DT creation for Simply Magnolia.
Crafty hugs
Donna x


Sunday 7 December 2014

It's Cold Outside Tilda And A New Challenge At Lovely Hanglar Or Sweet Magnolia

Good afternoon, crafty bloggers.
I hope you are well and getting into the festive mood?
Today we have our final challenge of 2014 at Lovely Hanglar Or Sweet Magnolia and this time our challenge theme is CHRISTMAS.
Our wonderful sponsor for this challenge is The Ribbon Girl with a £10 voucher for one lucky winner!

Here is the sixth commissioned card for hubby's work colleague. I made her seven altogether. The final card is a remembrance at Christmas card . I will share it with you all next week sometime as the orders for more Christmas cards are coming in fast and furious and I am a real busy bee!

I used It's Cold Outside Tilda from the new Waiting For Christmas 2014 Collection.
The image is stamped with Memento rich cocoa ink onto Neenah cardstock and cut out using a Spellbinders stately circle.
I have coloured the image with Primacolor and Polychromos pencils.


For my shaped card I used GoKreate large frame frilly #2 and Maja Design Vintage Frost Basics papers.
Other dies used are La - La - Land heart doily border, Sizzix on the edge snow flurries, Marianne Designs ivy circle and Christmas tree 1. Snow flake from Magnolia Doohickey club all I want for Christmas Vol #2 and Doohickey bloomy tag. Joy Crafts Billes flourishes and Cheery Lynn pine branches.I inked the die cuts with Tim Holtz spun sugar distress ink.
The pretty lace across the bottom of the card is from Live & Love Crafts.


For the flower arrangement I used a selection of flowers, pine cone and berries from The Ribbon Girl, Live & Love Crafts and Wild Orchid Crafts.The sweet cherub is from Live & Love Crafts.
I coated the arrangement with Snow - Tex.
The 5mm pink pearls on the Christmas tree are from The Ribbon Girl The bark star and jingle bells are from Live & Love Crafts. I have coated the tree, bark star and jingle bells with Snow - Tex.
The sentiment is computer generated in MS Word using a vintage digi stamp from Pink Gem Designs


Here is a close up of It's Cold Outside Tilda.
I added glamour dust to  the heart pom pom on Tilda's hat and fur on her coat.
I used lots of Snow - Tex surrounding Tilda's feet and for the snowy background.
I dotted Tilda's cheeks with a Inkssentials opaque white pen

We would love you to come and join in with our Christmas challenge.
My teamies have designed some gorgeous creations. Why not pop on over for a peek?
We will be back in January for the start of our next challenge.

I am entering my card into the following super challenges;


Thank you for stopping by to visit today and big thanks for all the lovely comments.
Crafty hugs
Donna xx


Sunday 30 November 2014

Merry Christmas Tilda And A New Challenge At Simply Magnolia.

Good morning, crafty blogger's.
I hope you are all well?
Today we have a new challenge starting at Simply Magnolia and this time our challenge is;
VINTAGE.
Our wonderful sponsor for this challenge is
Live & Love Crafts

This is the fifth commissioned card. I have now completed all seven and can finally get on with making my own Christmas cards for friends and family.

I used Merry Christmas Tilda from the Winter Wonderland 2013 Collection.
The image is stamped with Memento rich cocoa ink onto Neenah cardstock and cut out using a Joy Crafts Noor Design oval.
I have coloured the image with Prismacolor and Polychromos pencils.


For my shaped card I used GoKreate large frame frilly #2 and Maja Design A Gift For You papers.
Other dies used are La - La - Land heart doily border, Sizzix on the edge snow flurries, Marianne Design ivy circle, Christmas tree 1 and lamp. Doohickey bloomy tag, Joy Crafts Billes flourishes and Cheery Lynn pine branches.
I lightly sanded the papers and inked the die cuts with Tim Holtz tea dye distress ink.
The pretty lace across the bottom of the card is from Live & Love Crafts.


For the flower arrangement I used a selection of flowers, berries and pine cone from Wild Orchid Crafts and Live & Love Crafts.
I coated the arrangement with Snow - Tex.
I have coated the Christmas tree and lamp with Diamond Dust Twinklets and decorated the tree with a string of 3mm white pearls.
The sentiment is computer generated in MS Word using a Vintage digi stamp from Pink Gem Designs
I sprinkled a little shabby white Frantage onto the sentiment.


As always I have taken a close up picture of Merry Christmas Tilda.
I dotted Tilda's cheeks with an Inkssentials opaque white pen.


Inside the card is decorated with design paper and a Joy Crafts Noor Design oval.
I am still practising with my soft photo cube on how to get the correct light when taking a side view of my cards but, it's not quite right yet. Lol!!!

We would love you to come and join in with our fortnightly challenge.
My teamies have designed some gorgeous creations.
Why not pop on over for a peek?

I am entering my card into the following super challenges;
Tilda's Town Challenge #132..................It's Winter  (Not sure if my card qualifies for the challenge theme)

Thanks for stopping by to visit today and huge thanks for all the lovely comments I receive.
Crafty hugs
Donna xx


Sunday 23 November 2014

Tilda With Trumpet And A New Challenge At Lovely Hanglar Or Sweet Magnolia

Good afternoon, crafty bloggers.
I hope you are well?
We have a new challenge starting today at Lovely Hanglar Or Sweet magnolia and this time our challenge theme is;
Use A Die Cut
Our wonderful sponsor for this challenge is lovely Sandy from Live & Love Crafts

Here is my fourth commissioned Christmas card.

I used Tilda With Trumpet from the new Waiting For Christmas 2014 Collection.
The image is stamped with Memento rich cocoa ink onto Neenah cardstock and cut out using a Noor Design Joy Crafts oval.
I have coloured the image with Prismacolor and Polychromos pencils.


For my shaped card I used GoKreate large frame frilly #2 and Maja Design Coffee in the Arbour feel the grass between your toes.
other dies used are La - La - Land heart doily border, Sizzix on the edge snow flurries, marianne Design ivy circle amd Christmas tree 1. Joy Crafts Billes flourishes, Cheery Lynn pine branches and a snowflake from the Magnolia Doohickey club all I want for Christmas vol #2.
I have sanded the papers and inked the die cuts with Tim Holtz frayed burlock distress ink
The pretty lace is from Live & Love Crafts.


For the flower arrangement I used roses from Wild Orchid Crafts and Kort & Godt chrysanthemums, pine cone, frosted berries, an apple and decorative pins all from Live & Love Crafts.
I coated the arrangement with Snow - Tex.
Can you see the cherub with the trumpet at the bottom of the arrangement? She is from Live & Love Crafts too.
I have coated the tree with Snow - Tex and decorated it with pears on silver wire.
The sentiment is computer generated in MS Word using a vintage digi stamp from Pink Gem Designs 


Her is a close look at Tilda With Trumpet. Lovely isn't she?
I have sprinkled shabby white embossing enamel around the image and added glamour dust to her trumpet. I dotted  Tilda's cheeks with a Inkssentials opaque white pen.


Inside the card is decorated with the design paper and a Noor Design Joy Crafts oval.

We would love you to come and join in with our challenge.
My teamies have designed some gorgeous creations. Why not pop over for a peek?

I'm off to celebrate my Birthday now with my wonderful husband and Mother.

I am entering my card into the following super challenges;


Thank you for stopping by to visit today and big thanks for all the lovely comments.
Crafty hugs
Donna xx


Sunday 16 November 2014

In The Snow Ski Tilda And A new Challenge At Simply Magnolia.

Good morning, crafty blogger's.
I hope you are well?
Today we have a new challenge starting at Simply Magnolia and this time around our challenge theme is Layer It Up!
Our wonderful sponsor for this challenge is Crafty Ribbons

Here is the third of my commissioned Christmas cards although I am not entirely 
happy with it.

I used In The Snow Ski Tilda from the Winter Wonderland 2013 Collection.
The image is stamped with Memento rich cocoa ink onto Neenah cardstock and cut out using a Spellbinders stately circle.
I have coloured the image with Prismacolor and Polychromos pencils.


For my shaped card I used Go Kreate large frame frilly #2 and Maja Design Vintage Frost Basics papers.
Other dies used are La - La - land heart doily border, Joy Crafts Christmas ice crystal border and Billes flourishes, Marianne Design Ivy circle and Christmas tree 1, Cheery Lynn snowflake 5 and pine branches. I lightly sanded the papers and inked the die cuts with Tim Holtz tea dye distress ink.
The pretty lace is from Live & Love Crafts and the blue and white pearls are from The Ribbon Girl.
I computer generated the sentiment in MS Word using a vintage Christmas digital stamp from
 Pink Gem Designs and added a little Frantage shabby white embossing enamel.


I used a selection of flowers, pine cone, beaded berries and an apple from Live & Love Crafts and The Ribbon Girl. I coated the arrangements and tree with Snow - Tex.


Here is a close look at Tilda. Isn't she adorable?
I used lots of Snow - Tex I love this white stuff!
I also added some glamour dust at the bottom of the image but, it doesn't show here.
Tilda's cheeks are dotted with a Inkssentials opaque white pen.


Inside the card is decorated with Maja design paper and a Spellbinders stately circle.

We would love you to come and join in with our 2 weekly challenge.
My teamies have designed some gorgeous creations. Why not pop over for a peek?

I am entering my card into the following super challenges:


Thanks for stopping by to visit today and big thanks for all the lovely comments.
Crafty hugs
Donna xx


Sunday 9 November 2014

Noel Tilda And A New Challenge At Lovely Hanglar Or Sweet Magnolia

Good afternoon, crafty blogger's.
I hope you are well?
I have been so busy making Christmas cards for hubby's work colleague. I have made four now. Only three more to go. Phew! Then I can start on my own.

We have a new challenge starting today at Lovely Hanglar Or Sweet Magnolia and this time our challenge theme is Sparkle.
Our wonderful sponsor for this challenge is The Ribbon Girl with a £10 voucher for one lucky winner!
Here is the second of my commissioned Christmas cards.

I used Noel Tilda from the Winter Wonderland 2013 Collection.
The image is stamped with Memento rich cocoa ink onto Neenah cardstock and cut out using a CartUs oval and matted onto a Joy Crafts oval.
I have coloured the image with Prismacolor and Polychromos Pencils.


For my shaped card I used GoKreate large frame frilly #2 and Maja Design A Gift For You papers.
I used lots of dies. They are La - La - Land heart doily border, Sizzix on the edge snow flourishes, Little Darlings lovely view, Doohickey bloomy tag, Cheery Lynn snowflake 5, Joy Crafts Billles flourishes, Memory Box bright lanterns and marianne Design Christmas tree 1.
I have lightly sanded the papers and inked the die cuts with Tim Holtz tea dye distress ink.
The pretty lace is from Live & Love Crafts.


Here are a couple of close ups.
I sprayed the trees with Crafters companion spray and sparkle and painted Snow - Tex onto them. I coloured the candle inside the lantern with Prismas and added glamour dust to the flame. The lantern is coated with Snow - Tex too.
I bought a set of digital vintage Christmas sentiments from Pink Gems Designs and used a blank image to add my sentiment.
I found a fabulous tutorial Here on how to add a text to digital stamps MS Word.
I added a little Frantage white embossing enamel to the sentiment and adhered some 3mm  white pearls.
I used a selection of flowers, berries. a pine cone  and an apple from Live & Love crafts and The Ribbon Girl. Once again I coated the arrangement with Snow - Tex.


Here is close up of Noel Tilda.
I added glamour dust to the N and E on Noel and dotted Tolda's cheeks with a Inkssentials opaque white pen.


Inside the card is decorated with Maja paper and a Spellbinders stately circle.

We would love you to come and join in with us.
My reamies have designed some gorgeous creations. Why not pop over for a peek?

I am entering my card into the following super challenges;


Thanks for stopping by to visit today and big thanks for all the lovely comments I receive

Crafty hugs
Donna x


Sunday 2 November 2014

Baby Edwin And A New Challenge At Simply Magnolia.

Good morning, crafty blogger's
I hope you are well?
Welcome and a big thank you to my new followers.
Once I reach 100 followers I will be giving away some blog candy!

We have a new challenge starting today at Simply Magnolia and this time our challenge theme is Bling It On.
Lets see some bling on your cards/projects.
Our wonder sponsor for this challenge is The Rubber Buggy with a $15 voucher for one lucky winner!

I have another commissioned card to share for a baby's 1st Birthday.
This one was taken a few weeks ago before I bought my soft photo cube.
You can really tell the difference with the light.

I used Baby Edwin.
The image is stamped with Memento rich cocoa ink onto Neenah cardstock and cut out using a Mariannes Design stitched circle.
I have coloured the image with Prismacolor and Polychromos pencils.


For my shaped card I used GoKreate large frame frilly #2 and Maja Design Vintage Spring Basics papers.
Other dues used are La - La - Land heart border doily, Cheery Lynn french pastry doily, Marianne design clock, Memory Box simple banner and classic numbers.
I have inked the die cuts with Tim Holtz tea dye distress ink.
The white mesh across the centre of the card is from my local haberdashery store.
The Birthday sentiment is from LOTV. I matted it onto a Spellbinders scalloped circle and added a couple of 3mm white pearls.
I cut out the letters to spell Jacob with Pion studio of memories design paper.
The butterfly is cut out using Vintage Spring Basics and inked with tea dye distress ink.


The arrangements consist of a selection of flowers from Wild Orchid Crafts, The Ribbon Girl and 
Live & Love Crafts.
The ABC charm is from Live & love Crafts and the star pins are from The Ribbon Girl.
I have painted a little white modelling paste onto the star pins.


Here is a close up of Baby Edwin.
I surrounded the image with Frantage shabby white embossing enamel and dotted Edwin's cheeks with a Inkssentials opaque white pen.


Inside the card is decorated with Maja Design paper and a Marianne Design stitched circle.

Our challenge is 2 weekly and we would love you to come and join in.
My teamies have designed some gorgeous creations. Why not pop over for a peek?

I am entering my card into the following super challenges;


Thank you for stopping by to visit today and big thanks for all the lovely comments I receive.
They mean so much to me.

Have a lovely Sunday.
Crafty hugs
Donna x


Sunday 26 October 2014

Cosy Christmas Tilda And New Challenge at Lovely Hanglar Or Sweet Magnolia.

Good afternoon, crafty bloggers
I hope you are well? 
Did you remember to put the clocks back one hour? Lighter mornings and darker evenings. This year is flying by!
Anyway. Today we have a new challenge starting at Lovely Hanglar Or Sweet Magnolia and this time around our challenge theme is
Autumn Colours.
We don't have a sponsor for this challenge but, we are hoping that you will enter for a chance of winning a position as guest designer.

I have made a Christmas card. It's the first of seven card that I am making for a work colleague of my husband's.

I used Cosy Christmas Tilda from the Winter Wonderland 2013 Collection.
The image is stamped with Memento rich cocoa ink onto Neenah cardstock and cut out using a Spellbinders floral oval.
I have coloured the image with Polychromos  pencils.


For my shaped card I used GoKreate large frame frilly #2 and Maja Design Walking In The Forest papers.
Other dies used are La - La - Land heart doily border, Cheery Lynn french pastry doily and snowflake 5. Marianne Design creatables ivy circle and Christmas tree 1. Joy Crafts Billes flourishes and Doohickey bloomy tag.
I have lightly sanded the papers and inked the dies with Tim Holtz frayed burlock distress ink. I added Frantage shabby white embossing enamel to the tree.
The lace across the bottom of the card is from Live & Love Crafts.
The sentiment is from Pink Gem Designs
I also added a little Frantage to the sentiment.
I have tied a bow through the top of the bloomy tag with and  tied a rusty jingle bell with some hemp twine through the bow. The lace, bell and twine are all from The Ribbon Girl.


A close look at the flower arrangement.
I used  pine cones, white stamens and kort & Godt white chrysanthemums from The Ribbon Girl.
White foam flower spray and apples from Live & Love Crafts.
The green 25mm rose and tan 15mm roses are from Wild Orchid Crafts
I have brushed the arrangement with white modelling paste.


A close up of the tree and sentiment.
I wanted to use strings of pearls to decorate the tree but, I couldn't find them on Friday.
Today I found them. Lol!!!


A close look at Cosy Christmas Tilda. Gorgeous isn't she?
I added Snow-Tex to give texture to Tilda's pom pom and  once it was dry I coated it with Ranger frosted ice stickles.
I used a Inkssentials opaque white pen to dot Tilda's cheeks and adhered 3mm white pearls around the image.


Inside the card is decorated with design paper and a Spellbinders floral oval.

6 more Christmas cards to make not including the ones I am going to make for my family.
Gosh! I am going to be busy but, I love it.

Our challenge is 2 weekly and we would love you to come and join in.
My teamies have designed some gorgeous creations. Why not pop over for a peek?


I am entering my card into the following super challenges;

Thank you for stopping by to visit today and big thanks for the lovely comments I receive.
Crafty hugs.
Donna xx


Sunday 19 October 2014

Sitting Witch Tilda And A New Challenge At Simply Magnolia.

Good morning, crafty bloggers.
I hope you are well?
I am having so much fun experimenting with my new photo soft cube. The photographs of my creations are heaps better. No more annoying light either side of the cards which was driving me mad due to the fact I only had little work top space in the Kitchen to achieve a decent amount of light on my cards. I am very pleased with my purchase which was a recommendation from Gina's husband Phil who's photography of Gina's cards are absolutely stunning. Thanks Phil for all the tips etc. I will be a pro in no time at all. Lol!!!
Now, on to our challenge which starts today at Simply Magnolia
Our challenge theme for the next two weeks is;
Black & White plus one other colour.
I used black, white & green.
Our wonderful sponsor for this challenge is Magnolia-licious with a surprise package for one lucky winner!

I have made a Halloween card.

I used Sitting Witch Tilda from the So Spooky Collection 2009.
The image is stamped with Memento rich cocoa ink onto Neenah cardstock and cut out using a Lifesyle Quickutz nesting frame #10.
I have coloured the image with Prismacolor and Polychromos pencils.


For my shaped card I used Quickutz nesting frame #10 and Papermania Bexley black capsule collection papers.
Other dies used are La- La - land heart doily border, Cheery Lynn french pastry doily and pine branches. Marianne Designs clock, Doohickey lovely fence and Spellbinders beaded circle.
I have inked all the dies with Memento black ink.
The lace and pearls across the bottom of the card are from The Ribbon Girl and Live & love Crafts.
The witching hour sentiment is a freebie from Birdscards I have matted it onto a Spellbinders beaded circle.


Here is a close up of the smaller Marianne Design clock with the hands set at midnight.
The pumpkin and bat charms are from Bunny Zoes. I tied a bow with a piece of green embroidery thread through the top of the pumpkin  and brushed white modelling paste to both charms.


Here is a closer look at the arrangement. I used flowers from Wild Orchid Crafts and 
The Ribbon Girl.


A close up of Sitting Witch Tilda. I love her lots and lots.
I have used a Inkssentials opaque white pen to dot Tilda's cheeks and adhered a few 3mm white pearls around her.


Here is the card inside.
The sentiment is also from Birdscards I have printed the sentiment onto Neenah cardstock and cut it out using a Spellbinders stately circle.

 I thoroughly enjoyed colouring and making this card.

We would love you to come and join in with our challenge.
My teamies have designed some gorgeous creations. Why not pop on over for a peek?

I am entering my card into the following super challenges;


Thank you for stopping by to visit my blog today and big thanks for all the lovely comments.
Crafty hugs 
Donna xx