Thursday, 20 September 2018

Swedish House Crafts DT - Joyous Winterdays Santa Claus

Hello, lovely blogger friend's.
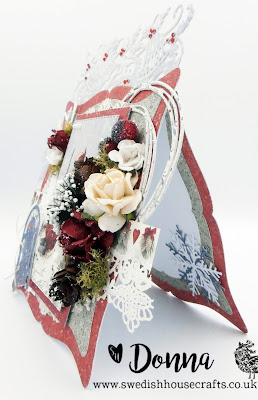
I'm here as well as on Swedish House Crafts blog today with a Christmas card that I have made using Maja Design "Joyous Winterdays" papers.

Links to the products are in text, and can be found at the end of my post.


For the shape of my card I used GoKreate large frame frilly #9.

I used crafter's Companion Edge'ables jingle bells, for the top of the card, and Sizzix On the edge snowflurries at the side.


I cut the image using Gummiapan stitched rectangles, and matted it onto a larger rectangle using ""Joyous Winterdays" papers. The 3mm white pearl flatbacks are from my stash!


The die cut tree is from Magnolia Doohickey club vol 16, and the die cut sled is cut from Magnolia Doohickey club vol 17. I attached a length of natural twine to the sled.


Behind the the image, I placed a couple of Gummiapan doodle circle die cuts.

The flowers are from my stash!


Inside the card is decorated to complement the front. The snowflakes inside the card have been cut using Gummiapan snowflake die.

Thanks for stopping by today! 

Links to the products used;


Sunday, 16 September 2018

A New Challenge At LHOSM..............Tilda With Star

Hello, lovely blogger friend's.

I hope you are well.

We have a new challenge starting today at Lovely Haenglar or Sweet Magnolia

Our challenge theme is: AUTUMN FLOWERS

As we do not have a sponsor for this current challenge. Gina will be offering one randomly drawn winner a surprise package.

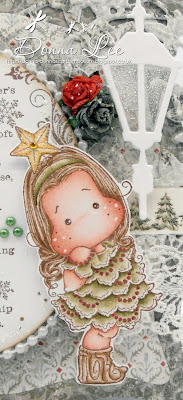
For this challenge I have coloured up Tilda with Star from the Christmas Party Collection 2017.
I have coloured her with Prismacolor & polychromos pencils, and fussy cut around her.

To create the card I used GoKreate large frame frilly # 9.

I used Maja Design Joyous Winterdays papers.

Other dies used are; Crafter's Companion Edge'ables Christmas bells. Marianne design lamp, and Ivy circle. Snowflake die from The Works.


The lace and flowers are from my stash!


The sentiment is from Magnolia Vintage box 6. 
I stamped the sentiment onto a Spellbinders oval with Memento rich cocoa ink , and stamped around the edges with an IndigoBlu floral swirl stamp. I die cut Spellbinders oval bliss using Joyous Winterdays papers, and adhered the sentiment on top with 2mm foam tape.
The pearl string surrounding the oval, and the 3mm green pearl flatbacks are from my stash!


I used artificial green moss, white flower sprays, a pine cone, olive green, and red 20mm open roses, a 35mm red cottage rose, and a burgandy pomegranate apple for the flower arrangement.

I die cut some Magnolia Doohickey sprawling ferns, and placed them between the arrangement.


I dotted Tilda's cheeks with a white gelly roll pen, and adhered a tiny yellow rhinestone to the centre of the star.


Inside the card is decorated to complement the front.

Our challenge will run for one whole month, and will close on Friday, 12th October 2018.

My teamies have designed some gorgeous creations.
Why not pop on over HERE for a peek!

I am entering my card into the following super challenge's;

Thank you for stopping by today.

crafty hugs

Donna xx


Thursday, 13 September 2018

Swedish House Crafts DT - Laserowe Chipboard Santa's Sleigh


Hello, lovely blogger friend's.

A while back Suha sent me Laserowe chipboard Santa's sleigh. I love the festive season. It's my favourite time of the year! I have decorated the sleigh using some mixed media products. 

TIP; Familiarise yourself with all of the pieces before assembling the sleigh with glue.

All of the mixed media products are from my own stash!

The link to the sleigh can be found at the end of my post.


I assembled the sleigh using pva glue, and left it to dry before painting it with white Gesso.

Once the Gesso had dried. I brushed a coating of white crackle paste over the sleigh, I did not use crackle paste on the runners. When the crackle paste had fully dried I used a bubble stencil and applied white texture paste to each of the side panels of the sleigh.

I wanted to add some colour to the sleigh. I dry brushed rose gold metallique wax over the entire sleigh adding a lot more of the wax to the runners.


Here you can see the sleigh at a different angle.


I painted some metal findings with white Gesso, and adhered them to the sleigh. I added some art stones, and dry brushed all of the findings with with aged brass metallique wax.

That's all from me today. I hope that I have inspired you to try out something different using Laserowe Santa's sleigh. Maybe you might like to see more Laserowe products. You can find them HERE

Thank you for stopping by today!

The link to Santa's sleigh;

Crafty hugs


Tuesday, 4 September 2018

Swedish House Crafts DT................Gummiapan Story Cake With Glasing Wedding card

Hello, lovely blogger friends.

I'm here as well as on Swedish House Crafts blog today with another card. Once again I have used Gummiapan story cake with glasing die.


I made the card for my Niece who got married in June this year.

For the shape of my card I used GoKreate large frame frilly#5. The pink papers that I used are Maja Design "Sofiero". The yellow papers, and pretty lace are from my stash!

Links to the products used are in text, and can be found at the end of my post.


I die cut an oval, and stamped around the edges with a stamp from my stash! Then I cut Gummiapan story cake with glasing using pink and yellow papers, and matted it onto the centre of the oval with foam tape, layering the tiers with 2mm foam tape.

I decorated the top of the cake with small mulberry flowers, trailing them down the side of the first tier. the 3mm yellow pearls that I have adhered to the centre of the daisies are from stash! The lovely tiny butterflies are included in the Gummiapan "story cake with glasing" set of dies.

I adhered a length of 3mm white pearl bead string from my stash around the outside of the oval. the 3mm pink pearls that I have randomly adhered around the cake are also from my stash!


I placed wrapped so lovely tags behind the oval The flowers, seam binding, and diamante heart are from my stash!


On the opposite side, underneath the oval, I placed Doohickey special release background hearts.

The resin frame is from my stash!


Inside the card is decorated to complement the front.

That's all from me, but I'll be back on the 13th September with something different to share!

Thank you for stopping by today!

You can find my blog HERE

Links to the products used;