Saturday 25 January 2020

Allsorts Challenge Guest Designer - Swedish House Crafts - Things with Wings

Hello, everyone!
I am guest today for Allsorts challenge blog. Suha, the owner of Swedish House Crafts is their sponsor for the weekly challenge, and she will be giving one lucky random selected winner a £10 voucher to spend in Swedish House Crafts online store. The Allsorts challenge theme is.......... 
'Things with Wings'. You can enter the challenge HERE.


I have made a card featuring Little Owl and Tilda, and used a couple of 12" x 12" sheets of Maja Design Denim & Girls papers on my card.

The dies, lace, and flowers that are on my card are from my stash!

Links to the products used can be found in text at the end of this post,


I coloured Little Owl and Tilda with Prismacolor pencils, and cut around her.
I adhered her onto an oval die cut using 2mm foam tape. I added dots to her cheeks, and top using a white gelly roll pen. The postmark stamp is a Magnolia oldie, The pink enamel dots are from my stash!


Inside the card is decorated with Maja Design papers.

Thank you for stopping by today!

Links to the products used:


Wednesday 8 January 2020

Christmas Projects Featuring Bloomar Designs | Swedish House Crafts


Hello, everyone.
I'm here to share a few projects I have made featuring Bloomar Designs beautiful Christmas collection of 3D laser chipboard models. and laser chipboard pieces.
I made two exploding boxes. and a mini album.


I used Maja Design 'Holiday in the Alps' 12" x 12" paper collection to decorate all of the projects.

The top of the box is decorated with Bloomar chipboard frame with holly branches, and paper flowers that I made using Lady E poinsettia & leaves die.
The stamens. and pine cones are from my stash! The holly leaves are cut using the leaves dies.


Links to the products that I have used from Swedish House Crafts. and Bloomar Designs can be found at the end of this post.


For my first exploding box I decorated each panel with Maja papers. and matted scallop shaped die cuts on to each panel. I matted papers that I cut using Roxstamps pierced circle die. and adhered each of them to the centre of the scallops with 2mm foam tape.

I adhered the chipboard pieces to each of the side panels. I decorated the pieces with frosted berries, and holly leaves that I cut using Lady E poinsettia & leaves dies.

The enamel dots are from my stash!


I assembled Bloomar 3D sled, and adhered it to the centre. I decorated the top with Bloomar 3D Ho Ho Ho cubes. and added artificial snow onto the cubes, sled and floor.

The resin polar bear is from my stash!


The lid of my second box is decorated similar to my first box, but I used Bloomar chipboard frame with snowflakes underneath my arrangement.


The inside of my second box is decorated the same as my first box, but I used different chipboard pieces. These are set 03 chipboard baubles, Christmas garland with hearts and stars, and Christmas garland with baubles hearts and stars.

I used enamel dots from my stash to embellish the Bloomar chipboard snowflakes.


I assembled Bloomar 3D Santas sleigh for the centre of my second box. I coated it with white gesso. and used waxes to give it colour.

I decorated inside Santas sleigh with handmade presents, berries and die cut holly leaves.


My third project is a mini album. I made the base using 300gsm white card, and covered it with Maja Design Holiday in the Alps papers.


I chose to cover the front of my album with traditional Santa. The image is included on one of the
12" x 12" sheets. I added some sparkle to his hair, and beard with a glitter pen. Sadly it doesn't show up in my picture. I dotted his cheeks with a white gelly roll pen.

The beautiful poinsettias are made using Lady E poinsettia & Winter leaves dies. The die is my favourite. I used a glue gun to adhere the flowers placing the leaves, berries, and pine cones around them.


Inside the album is decorated with papers, scalloped die cuts, and pierced circles that are matted onto the scalloped die cuts using 2mm foam tape.

Each of the circles are embellished with Bloomar Design chipboard pieces.
On the left circle I have adhered Christmas garland with hearts and stars, and Christmas snowflakes.

In the centre circle I adhered Christmas trees, and one of the sentiments from word set 03.

On the right circle I adhered Christmas garland with baubles, hearts & stars and Christmas snowflakes.

Each of the circles have been embellished with holly leaves, and berries.


The back of my album is decorated with design papers.
I made the handle with white card and adhered a panel of monochromes paper onto it. I decorated each end with a antique luxury squared ornament, and adhered a pearl button onto each of the ornament centres.

Thank you for stopping by, and happy new year!


Links to the products used from Swedish House Crafts

Links to Bloomar chipboard pieces

Tuesday 10 December 2019

Swedish House Crafts DT | Maja Design Holiday In The Alps Exploding Box


Hello, everyone!
I'm here with a festive exploding box that I have made using the newest Maja Design paper collection. This one is called 'Holiday in the Alps'.


Links to the products used can be found in text at the end of this post.


I made the base of the box with a sheet of snowflakes design paper, and matted the images that I cut from Winter night sentiment design paper onto arctic monograms paper.

I cut pieces from Laserowe Artic Sweeties pack to embellish each panel.


I used Laserowe 3D Christmas tree for the centre of my box. I painted it with white gesso, and once the gesso was dry I rubbed over the tree with dark gold wax. I adhered tiny gold jingle bells from my stash to each of the tree supports.

I made the tiny presents with some of the leftover Christmas in the Alps design papers.


I made the flowers with Lady E dies poinsettia, and flowers 004. The pinecones, and white berries are from my stash! 


Thank you for stopping by today!

Links to the products used;


Merry Christmas, and lots of festive hugs xx


Thursday 21 November 2019

Free Hugs | Swedish House Crafts DT

Hello, everyone!
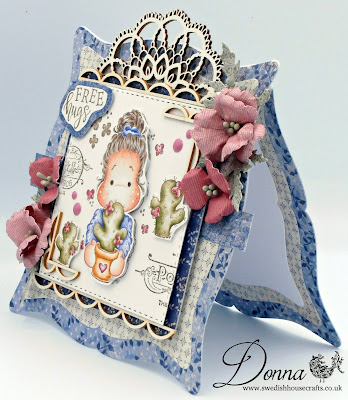
I'm here with a card that I have made featuring Free Hugs art stamp set from Magnolia Live Laugh Love collection 2019. 


I used all of the stamps from the set to complete my card.

Design papers are Maja Design - Denim & Friends - Blazer. I also used some lovely Laserowe Chipboard pieces, and made the tiny poppies using Lady E die.

Links to the products used can be found in text at the end of this post.


I coloured the images with my Polychromos pencils. I fussy cut Tilda, and the cactus. I adhered Tilda to the front of a square die cut with 2mm foam tape, and adhered the cactus with 1mm foam tape.
I used Laserowe round lace frame, and adhered it behind the die cut square
The borders top, and bottom of the square and the corners that I adhered to the square are taken from Laserowe chipboard rectangle scalloped frame, corners & borders.
I stamped, and cut around the free hugs sentiment and adhered it onto the corner wuth 1mm foam tape.


I made the poppies with design paper, and Lady E dies 006 poppy.


Inside the card is decorated to complement the front.

Thanks for stopping by!

Links to the products used;


Thursday 24 October 2019

Bee You Tida | Swedish House Crafts DT


Hello, everyone!
I'm here with a card that I have created featuring adorable bee you Tilda from bee you art stamp kit. I also used Maja Design Celebration papers. As well as Tilda there are nine other designs on the single unmouted rubber sheet.

Links to the products can be found in text at the end of my post


I coloured bee you Tilda with my Polychromos pencils and fussy cut around her, I die cut a piece of white card, and stamped the corners with honeycomb image which is included on the rubber sheet.
I adhered bee Tilda to the front using 2mm foam tape.


I used a selection of flowers from my stash to coordinate with the papers and image.


I die cut the bumble bee using a die from my stash, and the Maja Celebration papers.


Inside the card is decorated with Maja Celebration papers to complement the front.

Thank you for stopping by today!


Below are links to the products used;


Thursday 26 September 2019

Laserowe Winter Song Exploding Box | Swedish House Crafts DT


Hello, everyone!
I'm here with an exploding box that I have made for Swedish House Crafts DT using Laserowe Love Winter song papers, Laserowe 3D chipboard lantern. and new Lady E poinsettia dies.
To make the base, and box lid I used 300gsm white card from my stash!

Links to the products can be found in text at the end of my post.


I decorated each panel with the pretty Christmas papers, and embellished each one with images from the paper collection, chipboard pieces, and handmade paper poinsettias.


I decorated the centre square with Winter song papers. I assembled the 3D lantern, and painted it with white gesso. Once the gesso was dry I painted a coat of white crackle paste. Once the crackle paste was dry I rubbed over the entire lantern with wax to give a vintage look.

The tiny Christmas tree inside the lantern is from my stash! I coated the tree, and around the base of the tree with Snow-Tex. I hand tied gold jingle bells with twine and positioned them through a piece of shabby seam binding. The Snow-Tex, jingle bells, twine, and seam binding are from my stash!


I matted papers onto each of the panels. I used Roxstamps pierced circle die to cut out and mat papers on top of a scalloped edge die cut.
I cut around the bird from the paper collection, and used 2mm sticky pads to adhere it near the poinsettia. I made the poinsettia and holly leaves with paper and Lady E poinsettia die. The stamens in the centre of the poinsettia are from my stash!


I repeated the same on the above panel, but cut out a different bird from the paper collection.


I matted the papers, and used some chipboard pieces from my stash!

I repeated the same in the above picture.


I decorated the top of the box with pretty poinsettias that I made using the new Lady E poinsettia. and Winter leaves dies.


Thank you for stopping by today!

Below are links to the products used;


Saturday 31 August 2019

Sea Themed Altered Light Bulb

Hello, everyone.
I'm stopping by to share another mixed media project with you!

This time I have altered a solar light bulb.
I chose a solar light bulb because it has a flat base which makes it easier to stand on a work surface whilst decorating 😊

I created a sea theme using lots of lovely sea shells, a resin seahorse, an ornate resin frame, reindeer moss, Prima art stones and glass melanges.


I gave the bulb a couple of coats of white gesso, and white crackle paste. Once decorated I painted it with teal, and precious stone bloom sprays.
When the colour was dry. I dry brushed over the embellishments with white gesso.

I am in the process of making a sea themed canvas which I will be sharing soon,

Thanks for stopping by.

Crafty hugs
Donna x