Thursday, 28 September 2017

Swedish House Crafts - Lollipop card Using Pion Design "Legends Of The Sea"

Hello, lovely blogger friend's.
I'm here today to share my DT creation for Swedish House Crafts.
I have made a lollipop card using some of the gorgeous papers from Pion Design - "Legends Of The Sea" complete collection.
I have been eager to make a lollipop card for a while now. At last I get to cross it off of my list of things to make. I thoroughly enjoyed every minute that it took to make this one.
I have used some other gorgeous products from Swedish House Crafts store on my card.

Links to the products are in text, and can be found at the end of my post.


I used a collection of dies, papers, chipboard pieces, lace, pearl flower trim, pearl string, corked glass vial, vax cord, bronze metal anchor charm, and a paper straw to assemble and embellish my lollipop card.


I used a selection of papers and various dies to make the lollipop card
I die cut a Cheery Lynn English tea party doily using cream 300gsm cardstock for the base, and adhered the rosette that I made using papers from the collection to the centre of the doily.
I inked the heart chipboard with Tim Holtz Vintage photo distress ink , and adhered it behind another Cheery Lynn French pastry doily die cut.
I die cut a Gummiapan stitched square, and adhered it at an angle on top of the doily.
The banners have also been cut from one of the collection sheets, and positioned onto the card with 3D foam pads.
I cut out the sentiment. and matted it onto another piece of design paper, and adhered it to the centre of the card.
The lace, and pearl trim are from my stash.


I cut around the gorgeous mermaid image, and used 3D foam pads to adhere her to the card.
I outlined the tail with pva glue, and glamour dust to give a lovely sparkly effect.


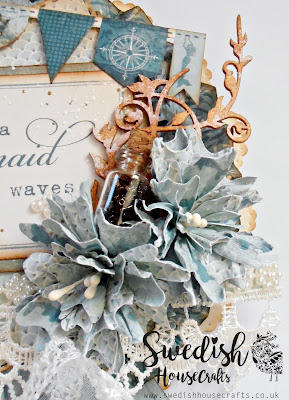
I made the flowers using Gummiapan flowers dies x 3.
I sprayed the flowers with water, and curled them up. When they were dry, I layered one on top of the other with adhesive. Then I pierced a hole in the centre for the stamens to go through.
I inked the chipboard foliage with Vintage photo distress ink.
I filled the tiny corked vial with seed beads, and adhered it to the base of the foliage.


Finally, I hand tied the bow with lace to the top of the straw with a length of pearl string beads, vax cord, and a bronze anchor charm all from my stash.

I hope you like my lollipop card?

Links to the products used are listed below.

Thank you for stopping by.
Big crafty hugs


Sunday, 17 September 2017

Christmas Caramel Tilda And A New Challenge At LHOSM

Hello, lovely blogger friend's.
I hope you are well.
Today see's a new challenge over on the Lovely Haenglar or Sweet Magnolia challenge blog.
Our month long challenge theme is...............ANYTHING GOES
Our wonderful sponsor is..................WILD ORCHID CRAFTS
I have made another Christmas card, and used lots of lovely products on my card from 
Swedish House Crafts 
Links to the products are in text, and can be found at the end of this post.

I used Christmas Caramel Tilda from A Little Christmas 2015 Collection.
I used Memento toffee crunch ink to stamp the image onto Bristol board extra smooth cardstock.
I have coloured Tilda with Prismacolor & Polychromos pencils, and cut around the image.


For the shape of my card I used GoKreate large frame frilly #2, and Maja Design 
"Vintage Frost Basics"
The pretty lace was a gift from my special bloggy friend!
Other dies used are; Marianne Design Anja's Vintage decoration, and poinsettia.
Sizzix "on the edge" snowflurries, and holiday greens.
Cheery Lynn English tea party doily, and Magnolia Doohickey oven.
I have inked the die cuts using Tim Holtz Vintage photo distress ink.
I used Snow - Tex on the snowfurries.


Here you can see a closer look at the oven, and flower arrangements.
I used Marianne Design poinsettia die, and Maja Vintage Frost basics papers to cut the poinsettia leaves, and layered them one on top of the other with a little glue. I then pierced a hole in the centre of the layered poinsettia's, and placed some stamens through the hole.
I added a pine cone, frosted berries, a 25mm open rose, and holiday greens foliage to make the arrangement complete.
I used a soft toothbrush dipped in Snow - Tex, and flicked it over the arrangements to give a light coating of snow.
I absolutely loved putting together the Doohickey oven.
I used 300gsm cream cardstock, and Vintage Frost Basics for the elements.
The sweet oven gloves have been hung from the door handle with a silver plated split ring.


A close look at Christmas caramel Tilda.
I die cut a Spellbinders oval with cream card, and stamped around the edges with an IndigoBlu decorative snowflake stamp.
I inked the outside of the oval with Vintage photo distress ink, and sprinkled around the inside with shabby white embossing enamel.
I die cut a Spellbinders oval bliss with Maja Vintage Frost Basics paper, and matted the oval onto it with 2mm foam tape. I adhered Tilda to the centre with 2mm foam tape.
Lastly I adhered a length of 3mm white pearl bead string around the outside.


Inside the card is decorated to compliment the front.

We would love you to come and join in with our current Anything Goes challenge, and please remember it's Magnolia or Haenglar images only.
The challenge ends on Friday 13th October so there is plenty of time to enter.

My teamies have designed some gorgeous creations. Why not pop over HERE for a peek?

Here are the links to the products that I have used on my card;

I am entering my card into the following super challenge's;


Thank you for stopping by to visit today, and big thanks for all the lovely comments that you so kindly take the time to leave for me to read.

Crafty hugs


Monday, 11 September 2017

Swedish House Crafts - Pion - Mister Tom's Treasures


Hello, lovely blogger friend's.
I hope you are well?
I'm here today to share my DT card for Swedish House Crafts
I have made a male 50th Birthday card using some of the gorgeous papers from 
Pion - Design Mister Tom's Treasures.
In general I don't make Male cards because as you probably know I love making girly cards with pretty lace, and flowers.
Suha, the store owner at Swedish House Crafts recommended the collection, and to my surprise it worked out really well, and I am very happy with what I achieved.
Links to the products that I used are in text, and can be found at the end of my post.

Here is my card.


To make the base of my card I used 300gsm Ivory cardstock.
I designed the layout of the card by cutting, and matting various designs from Mister Tom's Treasures 12" x 12" papers.and layered each of them onto the front of the card with glue, and 2mm foam tape.
 Prior to assembling the front of the card I die cut some of the papers using Gummiapan stitched banners thinner dies, and placed them between the base of the card at the top, and left side.
I distressed the edges of the papers with a paper distressing tool, and inked the edges of the papers with Tim Holtz Vintage photo distress ink.


I made a key fob to go onto the tag with number plates from he collection, and hung them with silver plated jump rings, silver plated chain, and a bronze coloured brad.


I cut around a large pocket watch, and small watch face from the collection, and adhered the face to the centre of the pocket watch.
Again, I have used silver plated jump rings, and chain to hang from the pocket watch.
I used glossy accents on the watch face to add some dimension.


I cut around one of the images from Pion Design - Images from the Past - Mr Tom's Treasures, and used 2mm foam tape to adhere it to the postcard.
The Happy Birthday sentiment is from my collection of cling stamps, and the number 50 I have die cut using Memory Box classic numbers dies.
The tiny wooden stars are from my stash!


Inside the card is decorated to compliment the front.

I hope that I have inspired you to have a go at creating a Male card using some of the papers from Mister Tom's Treasures.

If you clink onto the links at the end it will take you directly to the products that I have used.

Thank you for stopping by, and I hope that you like what you see?


Sunday, 3 September 2017

Twinkle Star Tilda - Midway Reminder At LHOSM

Hello, lovely blogger friend's.
I'm here to remind you that there is just under 2 weeks left to enter our current challenge at 
Lovely Haenglar or Sweet Magnolia
The challenge theme is DIE CUTS!
Our wonderful sponsor is THE RIBBON GIRL with a £10 voucher for one lucky randomly drawn winner!

I have made a Christmas card.
For the first time I have attempted the no lines colouring technique 😊
I used Twinkle Star Tilda from the Waiting For Christmas 2014 Collection.
You can find lots of  Magnolia Christmas stamps at Swedish House crafts
The image is stamped with Memento desert sand ink onto Bristol board extra smooth cardstock, and cut out using a CartUs oval die.
I have coloured the image with prismacolor & Polychromos pencils.


For the shape of my card I used GoKreate large frame frilly #10, and Maja Design 
"Home For The Holidays" papers from Swedish House Crafts
The pretty lace is from my stash.
Other dies used are: Sizzix on the edge snowflurries, Cheery Lynn English tea party doily, French pastry doily, and pine branches. Marianne Design Ivy circle, and Joy Crafts Ice crystal circle. I have inked the edges of the die cuts with Tim Holtz Vintage photo distress ink.


I made the pretty poinsettias using Marianne Design poinsettia dies, and "Home For The Holidays" papers. I used silver beaded berries for the centres.
For the foliage I used pine branches and Doohickey country leaves.
The country leaves dies are available to buy from Swedish House Crafts
The chipboard Christmas tree is Wycinanka. I painted it with white gesso, and adhered a tiny jingle bell on the top. 
The 3mm pearls that I have adhered onto the tree are from my stash!
The chipboard snowflake is Scrapiniec. I painted it with white gesso, and sprinkled some glamour dust on it to give it some sparkle. I adhered a 3mm pearl to the centre.


Here is a closer look at the poinsettia.


A close look at Twinkle Star Tilda.
I loved colouring her!
The background stamp that I used is Magnolia Merry Christmas postmark.
I sprinkled a little shaby white embossing enamel around the outside of the image, and matted the oval onto a Joy Crafts oval with 2mm foam tape.
I adhered a length of 2mm white pearl string around the outside of the matted image.
I used glamour dust on the star, and dotted Tilda's cheeks, and eyes with a white gelly roll pen.


Inside the card is decorated to complement the front.

We would love you to come and join in with our current die cuts challenge, and please remember it's Magnolia or Haenglar images only.
Our challenge ends on Friday September 15th so there is still plenty of time to enter.

My teamies have designed some gorgeous creations.
Why not pop over HERE for a peek?

I am entering my card into the following super challenge's;
(Magnolia Stamp, Die Cuts, Lace & Flowers)

Thank you for stopping by to visit today, and big thanks for all the lovely comments that you so kindly take the time to leave for me to read.

Crafty hugs