
Hello, crafty bloggers.
Firstly, I am so excited as I have been chosen as new DT member for Marvelous Magnolia.
I am really looking forward to joining Rina and the other DT ladies.
I will be posting my first creation as DT member here on my blog on the 6th February 2014.
Yippee! Lol!!!
On to today's creation...........I have made another shaped card. I love making them. Can you tell?
This is a commissioned Birthday card. I have chosen London Tilda from the Little London Collection 2013.

For the shaped card I have used 300gsm white Conqueror card and GoKreate large frames frilly #2 from Cuttingedgecrafts.
The pretty papers are Maja Design Vintage Summer Basics from Live & Love Crafts.
The doily and lovely lace are from Ebay. You can find the lace HERE.
I inked around the edges of the doily with Tim Holtz spun sugar distress ink and adhered a strip of pink satin edged ribbon across the top of the lace.
The lamp post die cut is Joy Crafts and the lovely fence die cut is Magnolia Doohickey.
I have inked the edges of both the lamp post and lovely fence with spun sugar distress ink.
The Pippi butterfly on the lamp post is Memory Box.
I have frantaged the butterfly with shabby pink embossing enamel and coloured the centre with a pink Polychromos pencil.
I die cut a Spellbinders floral oval with Neenah cardstock and stamped London Tilda onto it with Memento rich cocoa ink.
I coloured Tilda with Prismacolor and Polychromos pencils and inked the edges of the floral oval with spun sugar distress ink.
I have adhered a string of white pearls from Live & Love Crafts around the inside of the frame.

Here is the card with the tag removed.
The sentiment is Papermania occassions. I have sprinked around the sentiment with Frantage shabby pink embossing enamel from Live & Love Craftsand made it into a gift tag by punching a hole in one end and tying a bow through it with white shabby seam binding also from Live & Love Crafts.
The filigree corner is La-La-Land. I have inked the edges with spun sugar distress ink.

I found a fabulous tutorial in Magnolia Ink N0 4 2013 on how to make the Doohickey orchids.
My super bloggy friend sent me the Doohickey orchid die cuts
To create 1 orchid I cut off the pistol of the flower. I inked the edges of the orchid with spun sugar distress ink. I then coloured the pistol and the centre of the orchid with a pink Polychromos pencil and added some Ranger white perfect pearls to the centre of the flower.
I bent the orchid part with the two round leaves and pushed the leaves of the other one towards each other. I pierced a hole through the centre of the pistol. I coloured three white stamens from
Wild Orchid Crafts with a carnation pink Promarker and threaded them through the pistol, coloured flower and leaves.
Ta Dah!!!
Thank you to Monique for her Magnolia Ink magazine tutorial.
I die cut three Cheery Lynn pine branches and inked the edges with spun sugar distress ink placing them between the orchids.
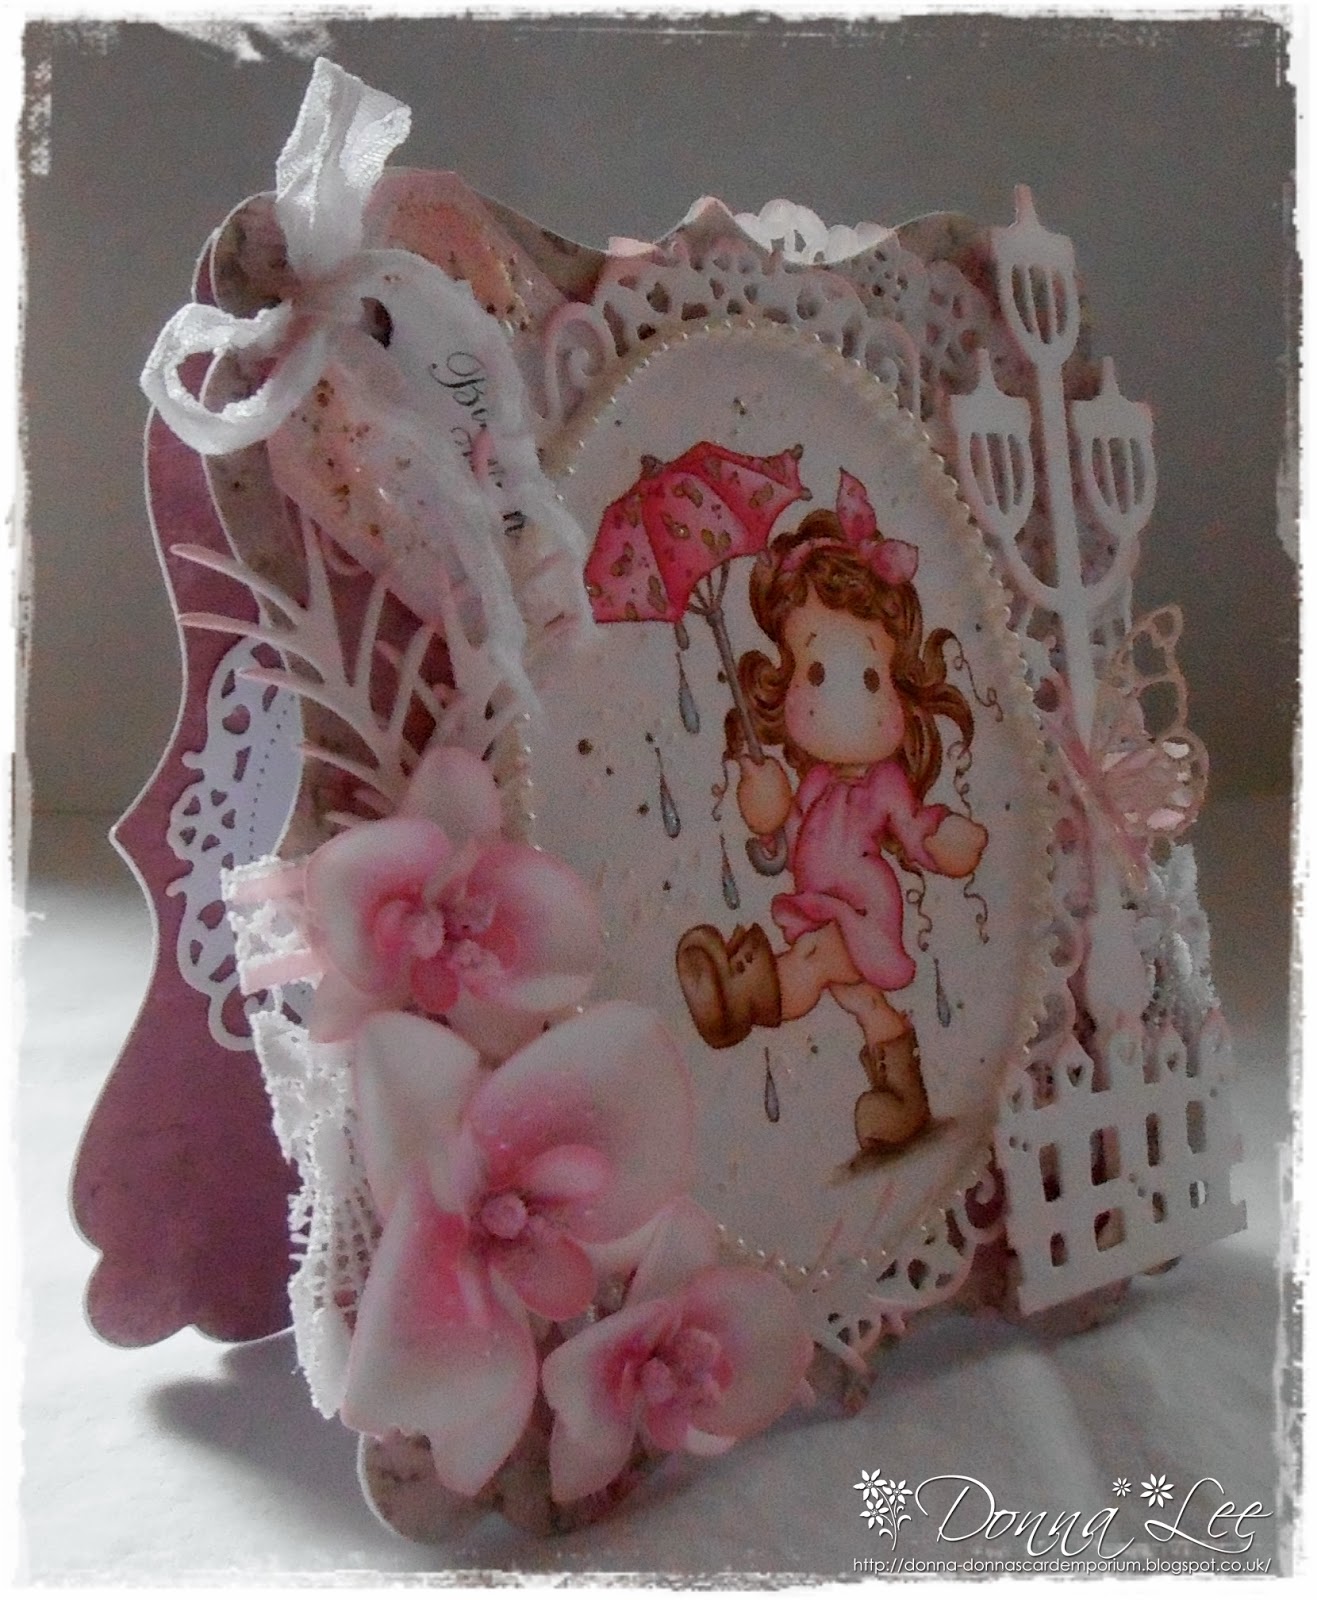
Inside the card is decorated with Maja Design Vintage Summer Basics paper and a Spellbinders floral oval.

A close up picture of London Tilda.
I have sprinkled frantage shabby white embossing enamel from Live & Love Crafts around Tilda and added ArtDeco glamour dust to the raindrops.
I have dotted Tilda's cheeks with an Inkssentials opaque white pen.
I hope you like my creation?
I am entering my creation into the following super challenges:
I have another 2 commissioned cards to make. Mother's day cards. So I am off to do some colouring.
Thank you for stopping by to visit and big thanks for all the lovely comments that I recieve.
Crafty hugs.
Donna xx
Wow Donna! Just stunning! Your colouring is just so beautiful and the details, man! Think you've done a great job with the orchids they look so gorgeous!
ReplyDeleteAnd congrats on being on the Marvelous Magnolia Design Team! With such fantastic creations your deserve your spot in the Team! Hugs,
http://littlecreass.blogspot.com/
Good morning Donna,
ReplyDeleteCongrats on your new DT post
Another superb card
Hugs Teresa x
Hi Donna those orchids are stunning ...she is stunning too...adore the die cuts and am so so pleased for you ...looking forward to seeing your Marvelous creations ;0)
ReplyDeleteHello Donna,
ReplyDeleteWhat a lovely card!!
Hugs Marrie
So, so gorgeous, Donna! I love your card! Thanks for joining us at Tilda's Town and good luck! Delphine xx
ReplyDeleteBeautiful card. Love all the sweet details and the pink colors really goes together.Thanks for joining us at Tilda's Town. Hugs, Babi.
ReplyDeleteThis is Stunning! Gorgeous Embellies and beautiful Detail! Love your blog
ReplyDeleteWonderful card Donna!!! Love the super cute Tilda, your colouring and all the details!!
ReplyDeleteThanks so much for joining us at Tilda's Town this week.
Hugs
Cinzia
Fabulous card Donna :-) Tilda is gorgeous and all the details and die cuts are fabulous ! so pretty :-)
ReplyDeletethanks for joining us on the Papertake Weekly Challenge
luv
Lols x x x
Wow!! a beautiful card Donna, fabulous design, colouring and those flowers are stunning. Thank you so much for coming over to play at Magnolia-licious. Good luck!
ReplyDeleteHugs
Suzi x
This is beautiful, Thanks for joining us at D.O.C.
ReplyDeleteHUGZ Fleur xXx
Hi Donna. I just found your blog and have become a follower after seeing what beautiful cards you make!! This one is gorgeous! Congrats on your new DT. I look forward to seeing your future makes. Hugs, Marie xx
ReplyDelete